July 12th, 2026
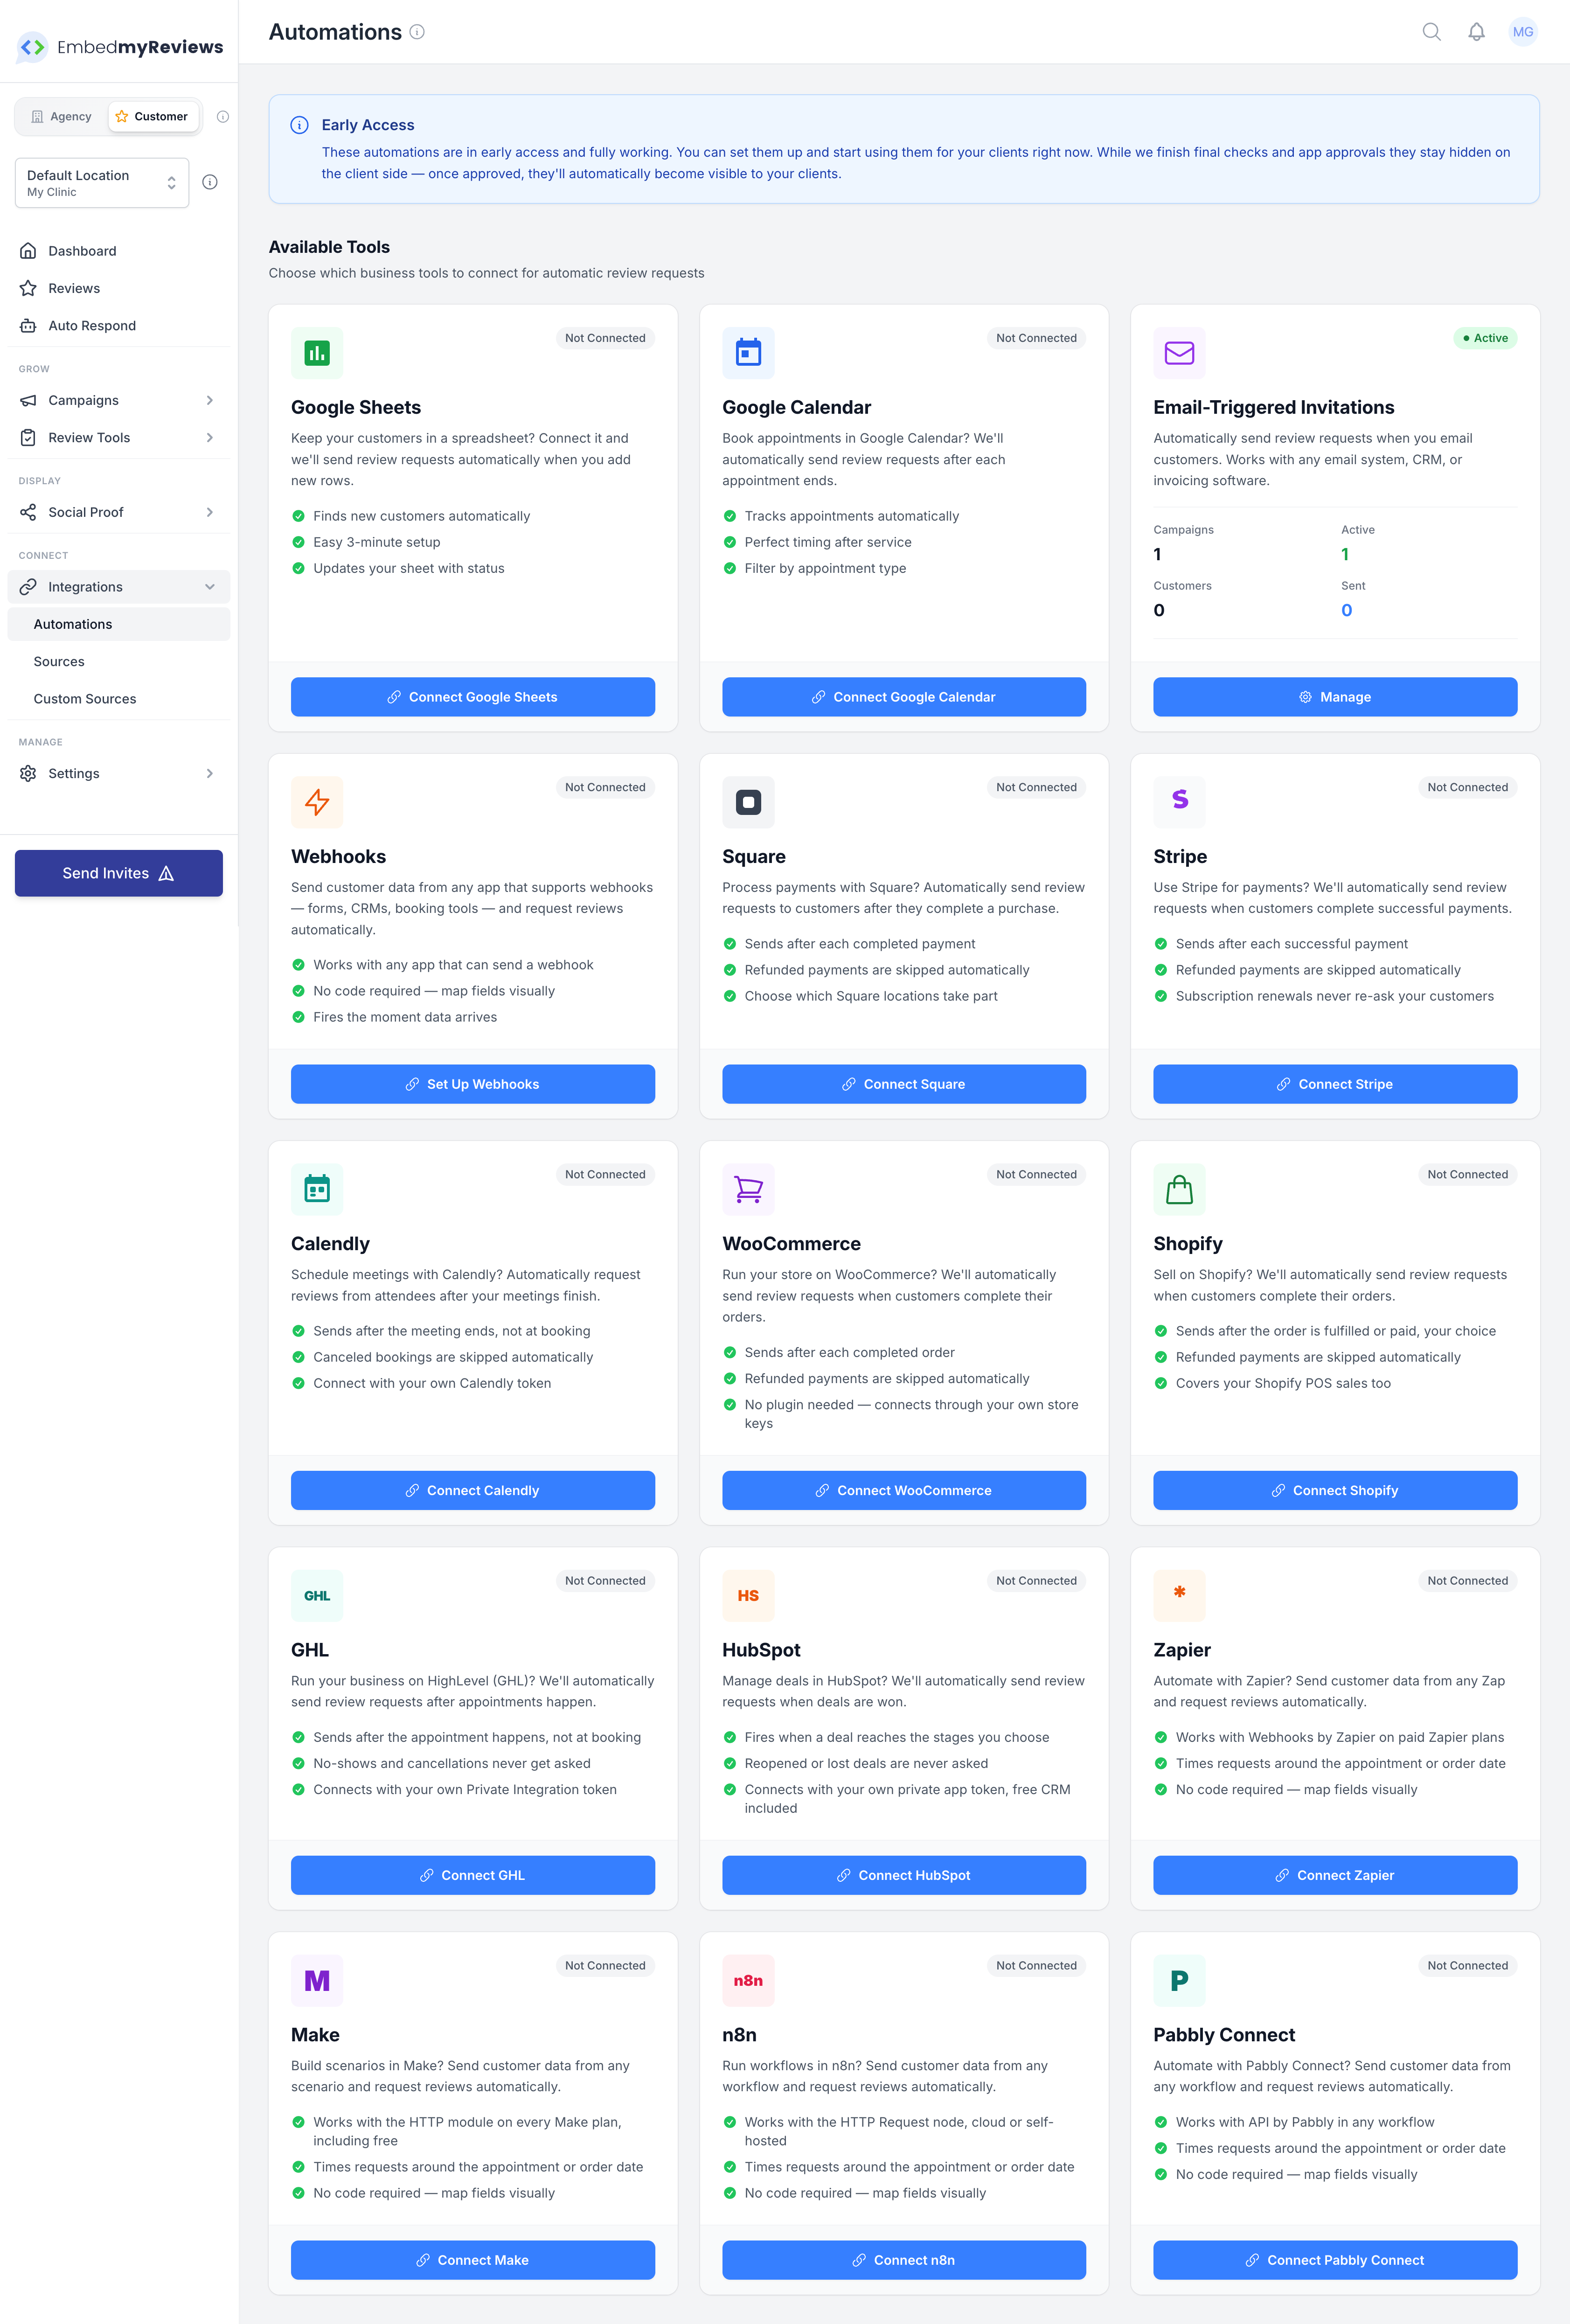
You can now automate review requests by connecting EMR directly to the tools your clients already use every day.
Instead of uploading CSV files or manually adding contacts, these automations can trigger review invitations automatically from your clients’ POS systems, CRMs, ecommerce platforms, calendars and other business tools.
Where to find them
From your Agency Dashboard:
Customers → Integrations → Automations
Automations available in early access
Google Sheets
Google Calendar
Square POS
Stripe
Calendly
WooCommerce
Shopify
GHL (GoHighLevel)
HubSpot
Zapier
Make
n8n
Pabbly Connect
Inbound Webhooks
Connect almost any platform that supports outbound webhooks or API calls, without needing to build a custom integration.
Email-Triggered Invitations
Automatically send review requests when an email is sent to a customer. This works with virtually any email system, CRM or invoicing platform.
Agency access during early access
These automations are currently available through the agency dashboard, allowing you to connect and manage them on behalf of your clients.
Once we have gathered enough usage data and confirmed everything is running smoothly, automations will be added to Custom Plans. This will allow agencies to control which integrations their clients can see, access and configure themselves.
More automations are coming
We are already working on the next wave of integrations.
To request a specific platform, submit it through the EMR roadmap and include a link to its API or integration documentation. The more information you provide, the faster we can assess and build it.
June 30th, 2026
We have added two things that work beautifully together: video testimonials, and a brand new Wall of Love widget to show them off.
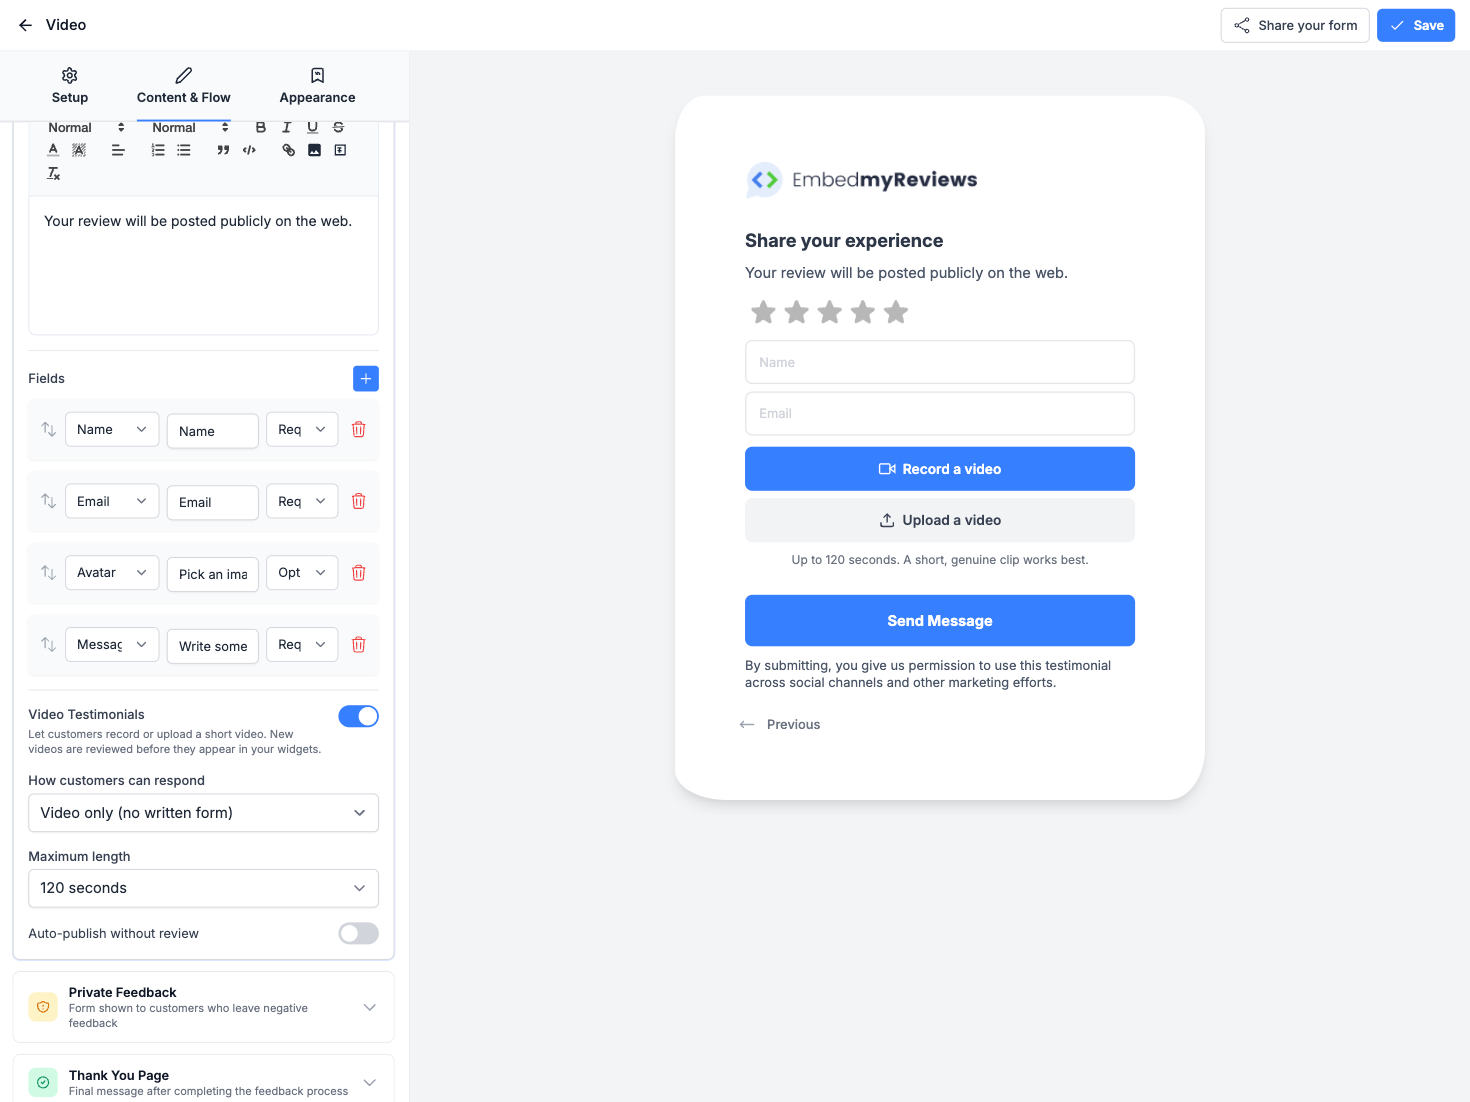
Video testimonials
Your customers can now leave a video, not just text. It works right inside the feedback form, so there is nothing extra to set up beyond turning it on.
What you get:
Record or upload. Customers can record straight from their phone or computer camera, or upload a video they already have.
Built for mobile. The recording experience is designed for phones first, since that is where most people will film themselves. It uses the native camera on iOS and Android for a smooth, familiar flow.
Automatic processing. Once a video comes in, we handle the heavy lifting in the background (converting it, generating a thumbnail, and getting it ready to display). You do not have to touch anything.
You stay in control. Every video lands in your Reviews area as pending so you can watch it first, then approve or reject it before it goes public. Approved videos are the only ones that ever show.
Watch and download. From the Reviews page and your dashboards you can play any video testimonial inline and download the original file, handy for ads, social posts, or your website.
How to switch it on
Video testimonials are part of testimonials. Turn testimonials on for a customer and the option to collect video becomes available on their feedback form. That is the whole setup.
The new Wall of Love widget
We also built a Wall of Love widget, a clean, modern grid that mixes your text and video reviews into one scrolling wall of social proof. It is the kind of section you would proudly put on a homepage or landing page.
A responsive layout that looks right on any screen size.
Video reviews play in place, with a tidy lightbox for full screen viewing.
Loads more as visitors scroll, so even a large collection stays fast.
Which widgets support video
For now, video testimonials display in the Wall of Love widget only. This is where they look their best, so it felt like the right place to start.
We do plan to look at bringing video into more widgets over time. If there is a specific widget you would love to see support video, please submit it to our roadmap and let us know. The more requests a widget gets, the sooner it moves up the list.
May 27th, 2026

As apart of our ongoing improvements to the platform your customers can now add their own custom domain to the hosted feedback form.
To get started with enabling this feature for your customers go to the custom plan options:
Go to Review Tools
Under Feedback Forms enable the option: “Custom Domain for Feedback Forms“
Click save on plan options
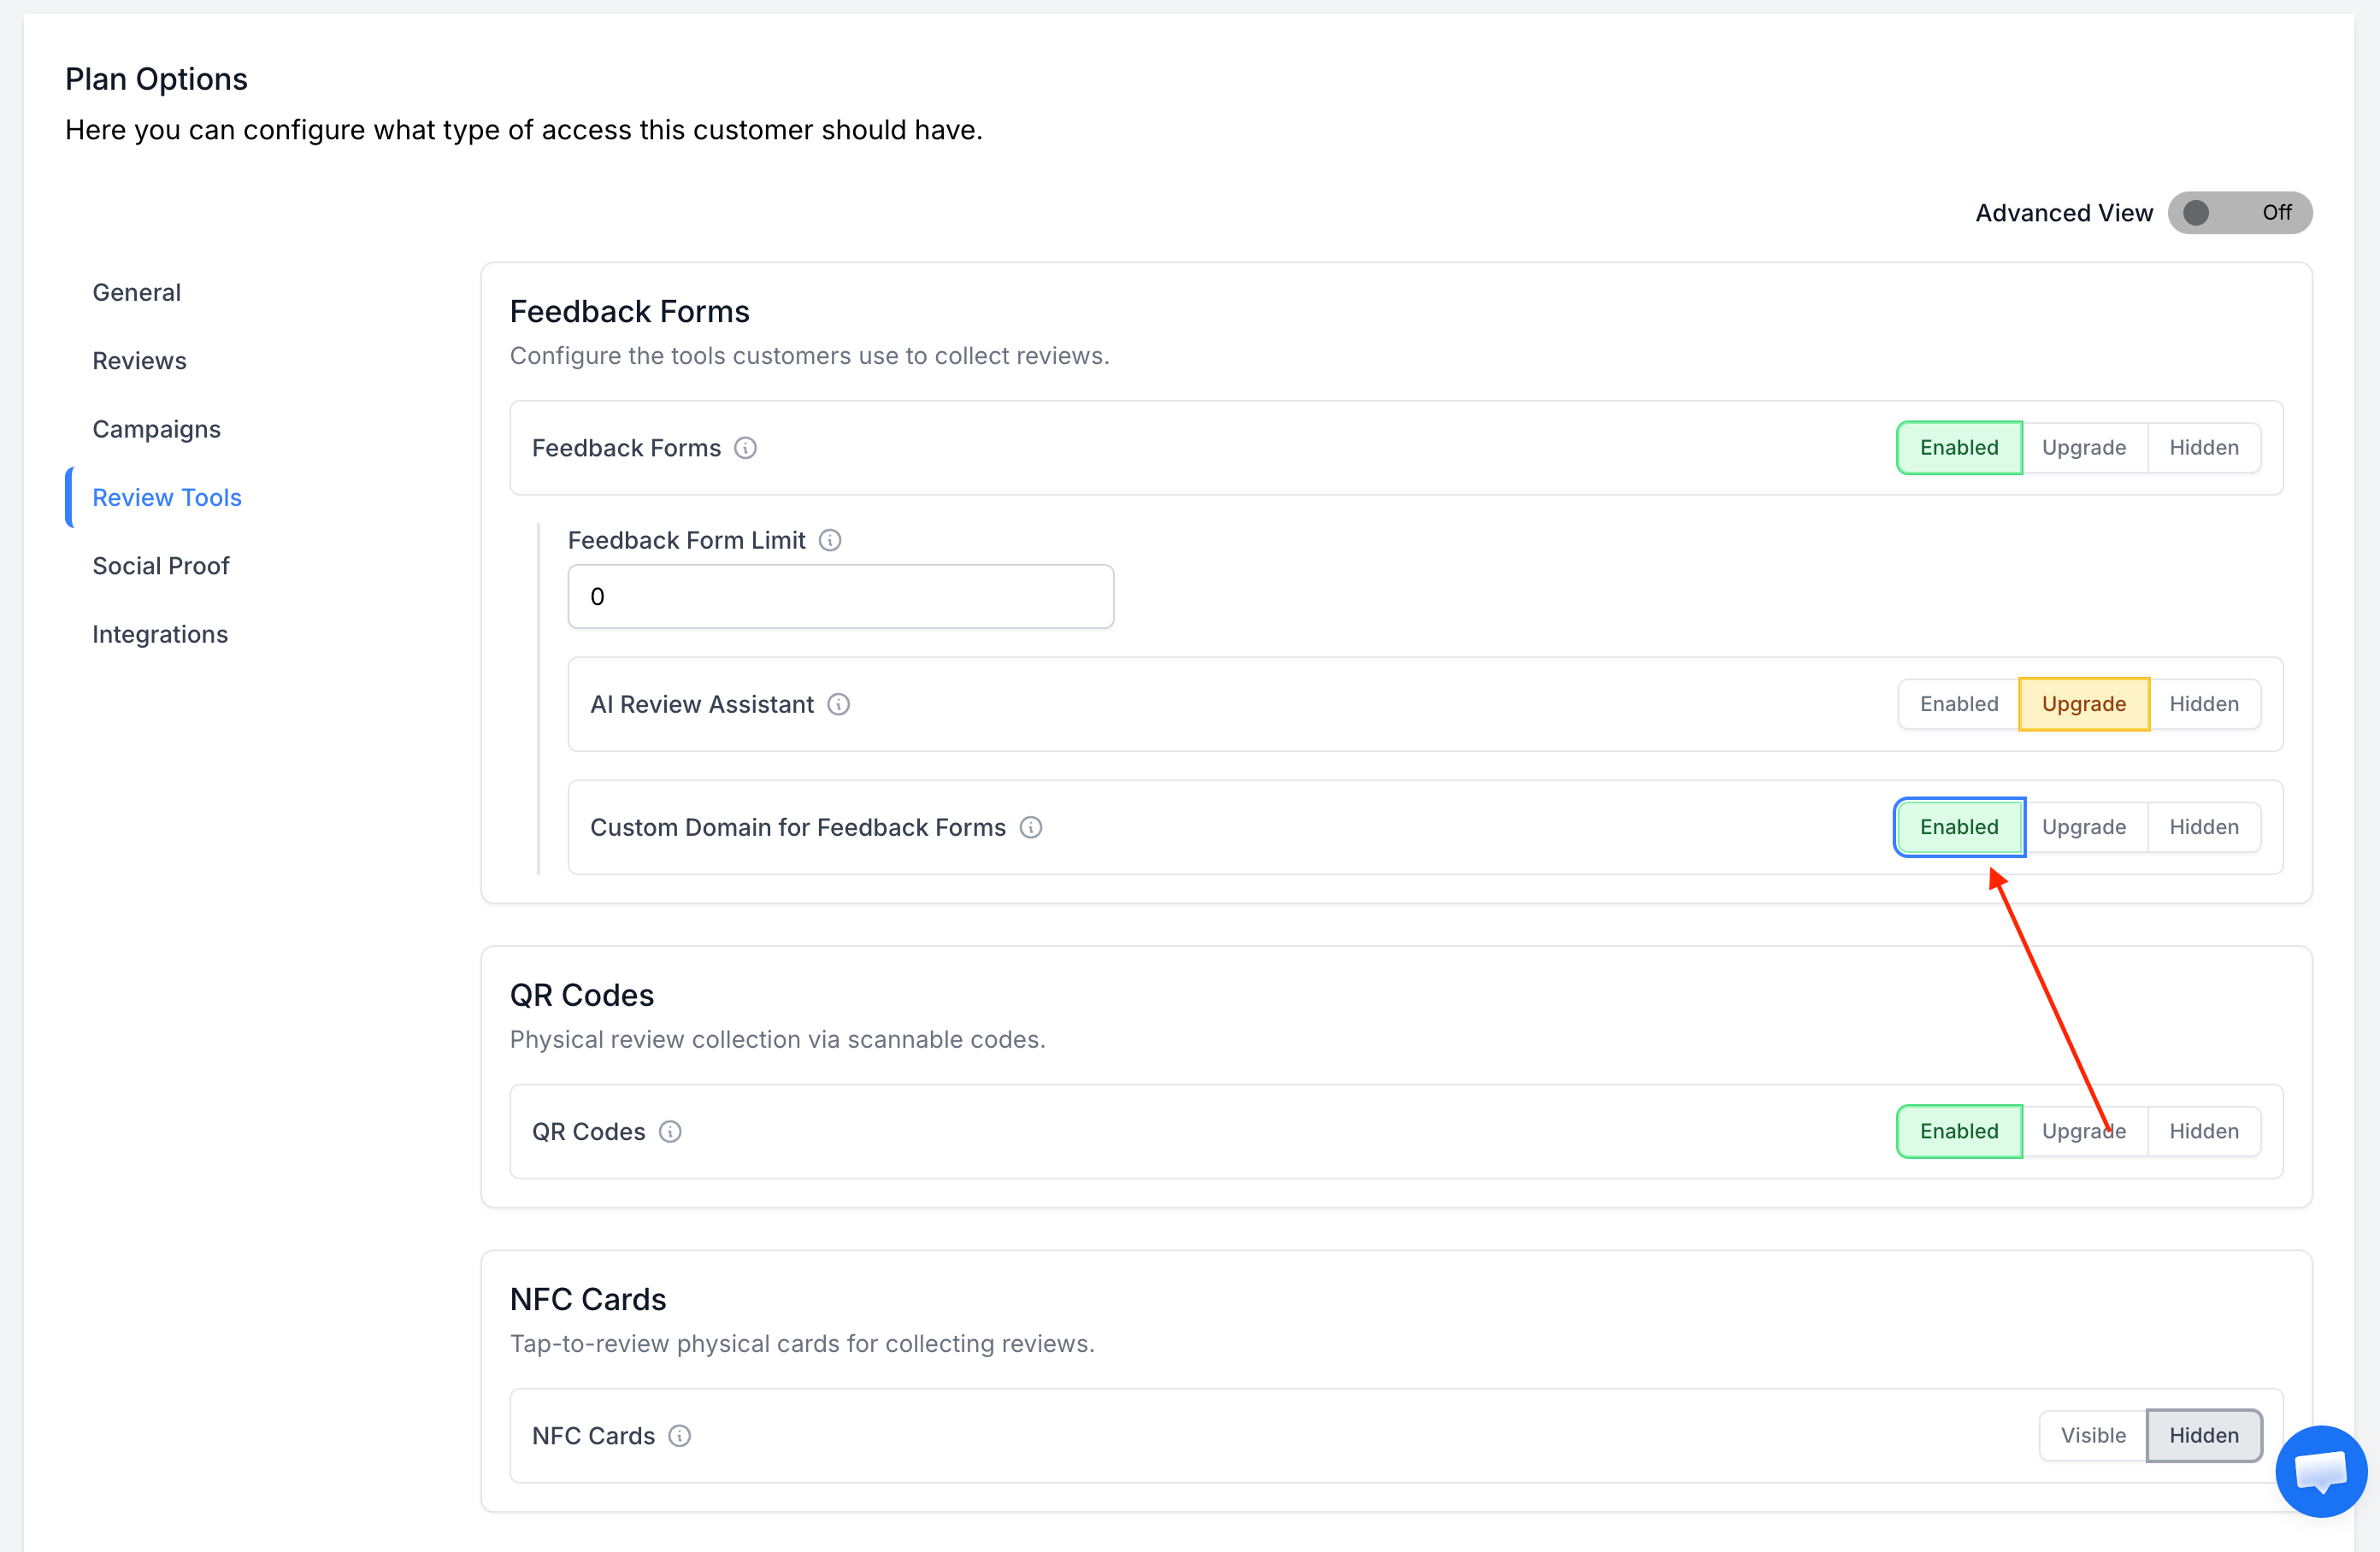
Once this is done you can login as the customer and under Review Tools go to Feedback forms, click edit on the feedback form you want to use a custom domain on and click add under Form URL:
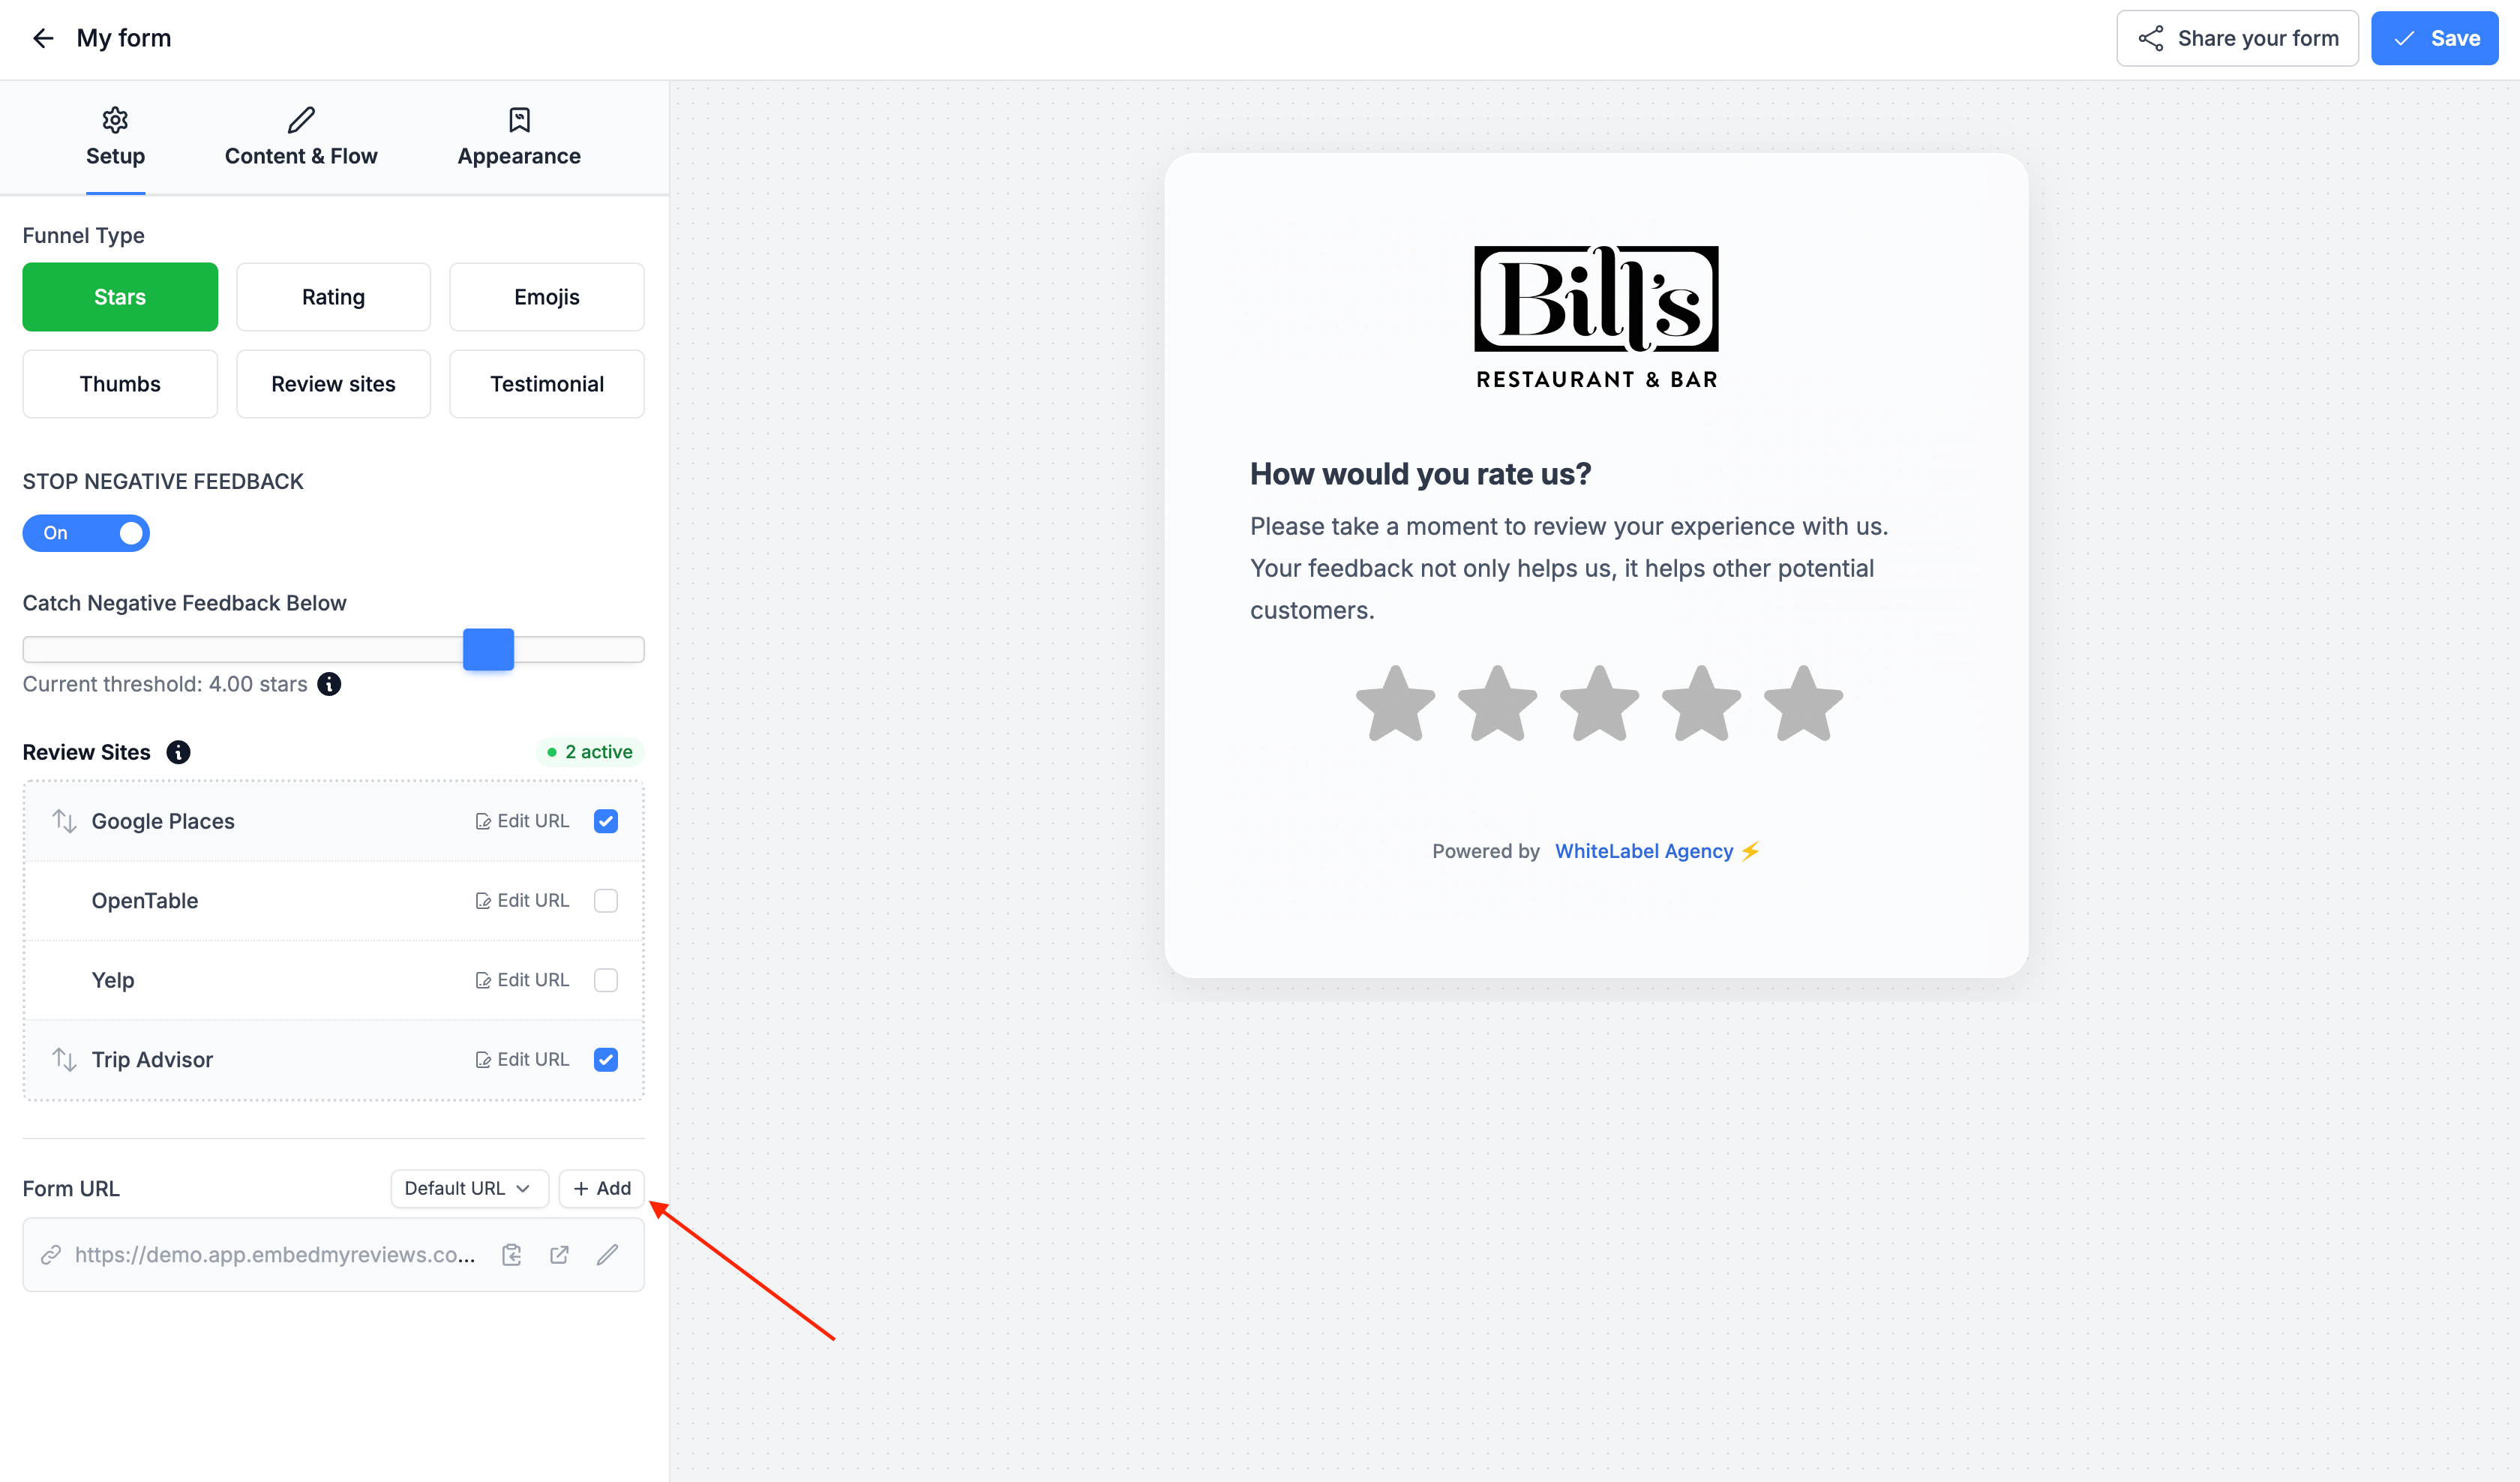
Note: The original URL will continue to work as before, but this gives you the option to allow your customers to use their own address if they wish.
May 18th, 2026
A significant release for any agency taking reputation management to market. The headline addition is self serve Sales Intelligence, which we genuinely believe is the strongest lead conversion tool available in the white label reputation management space right now. Full breakdown below.
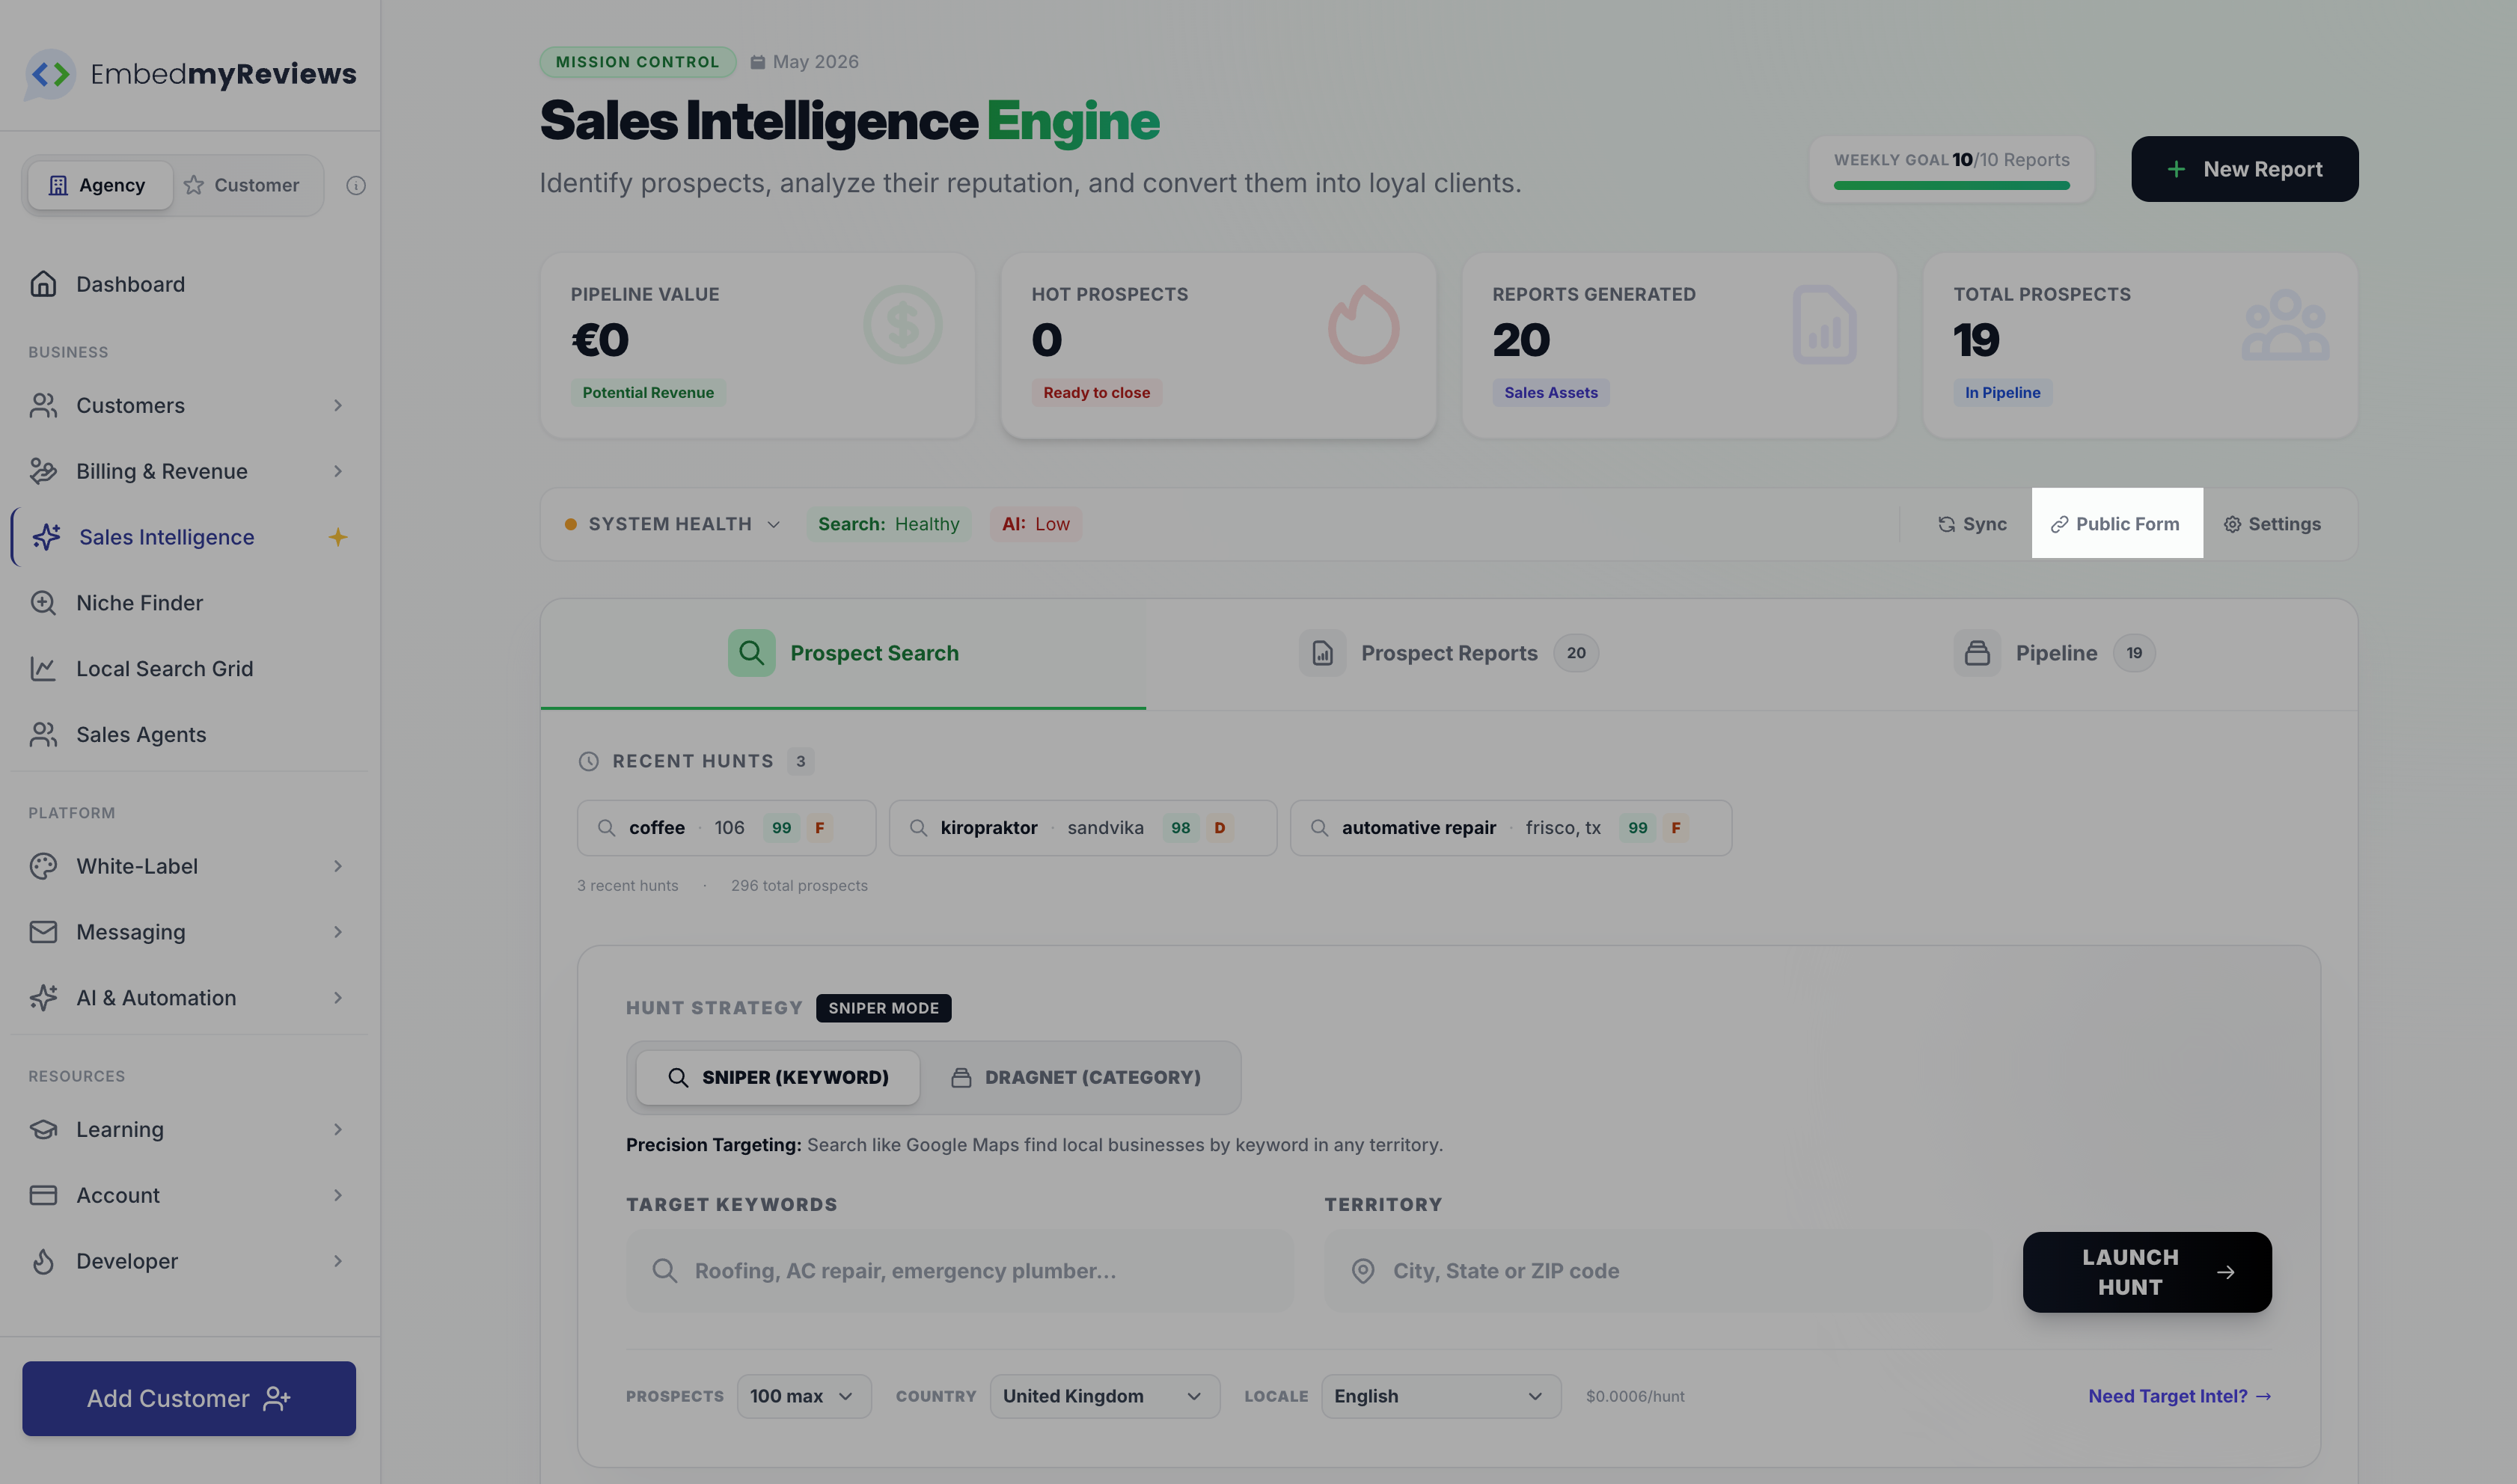
Self Serve Sales Intelligence Reports
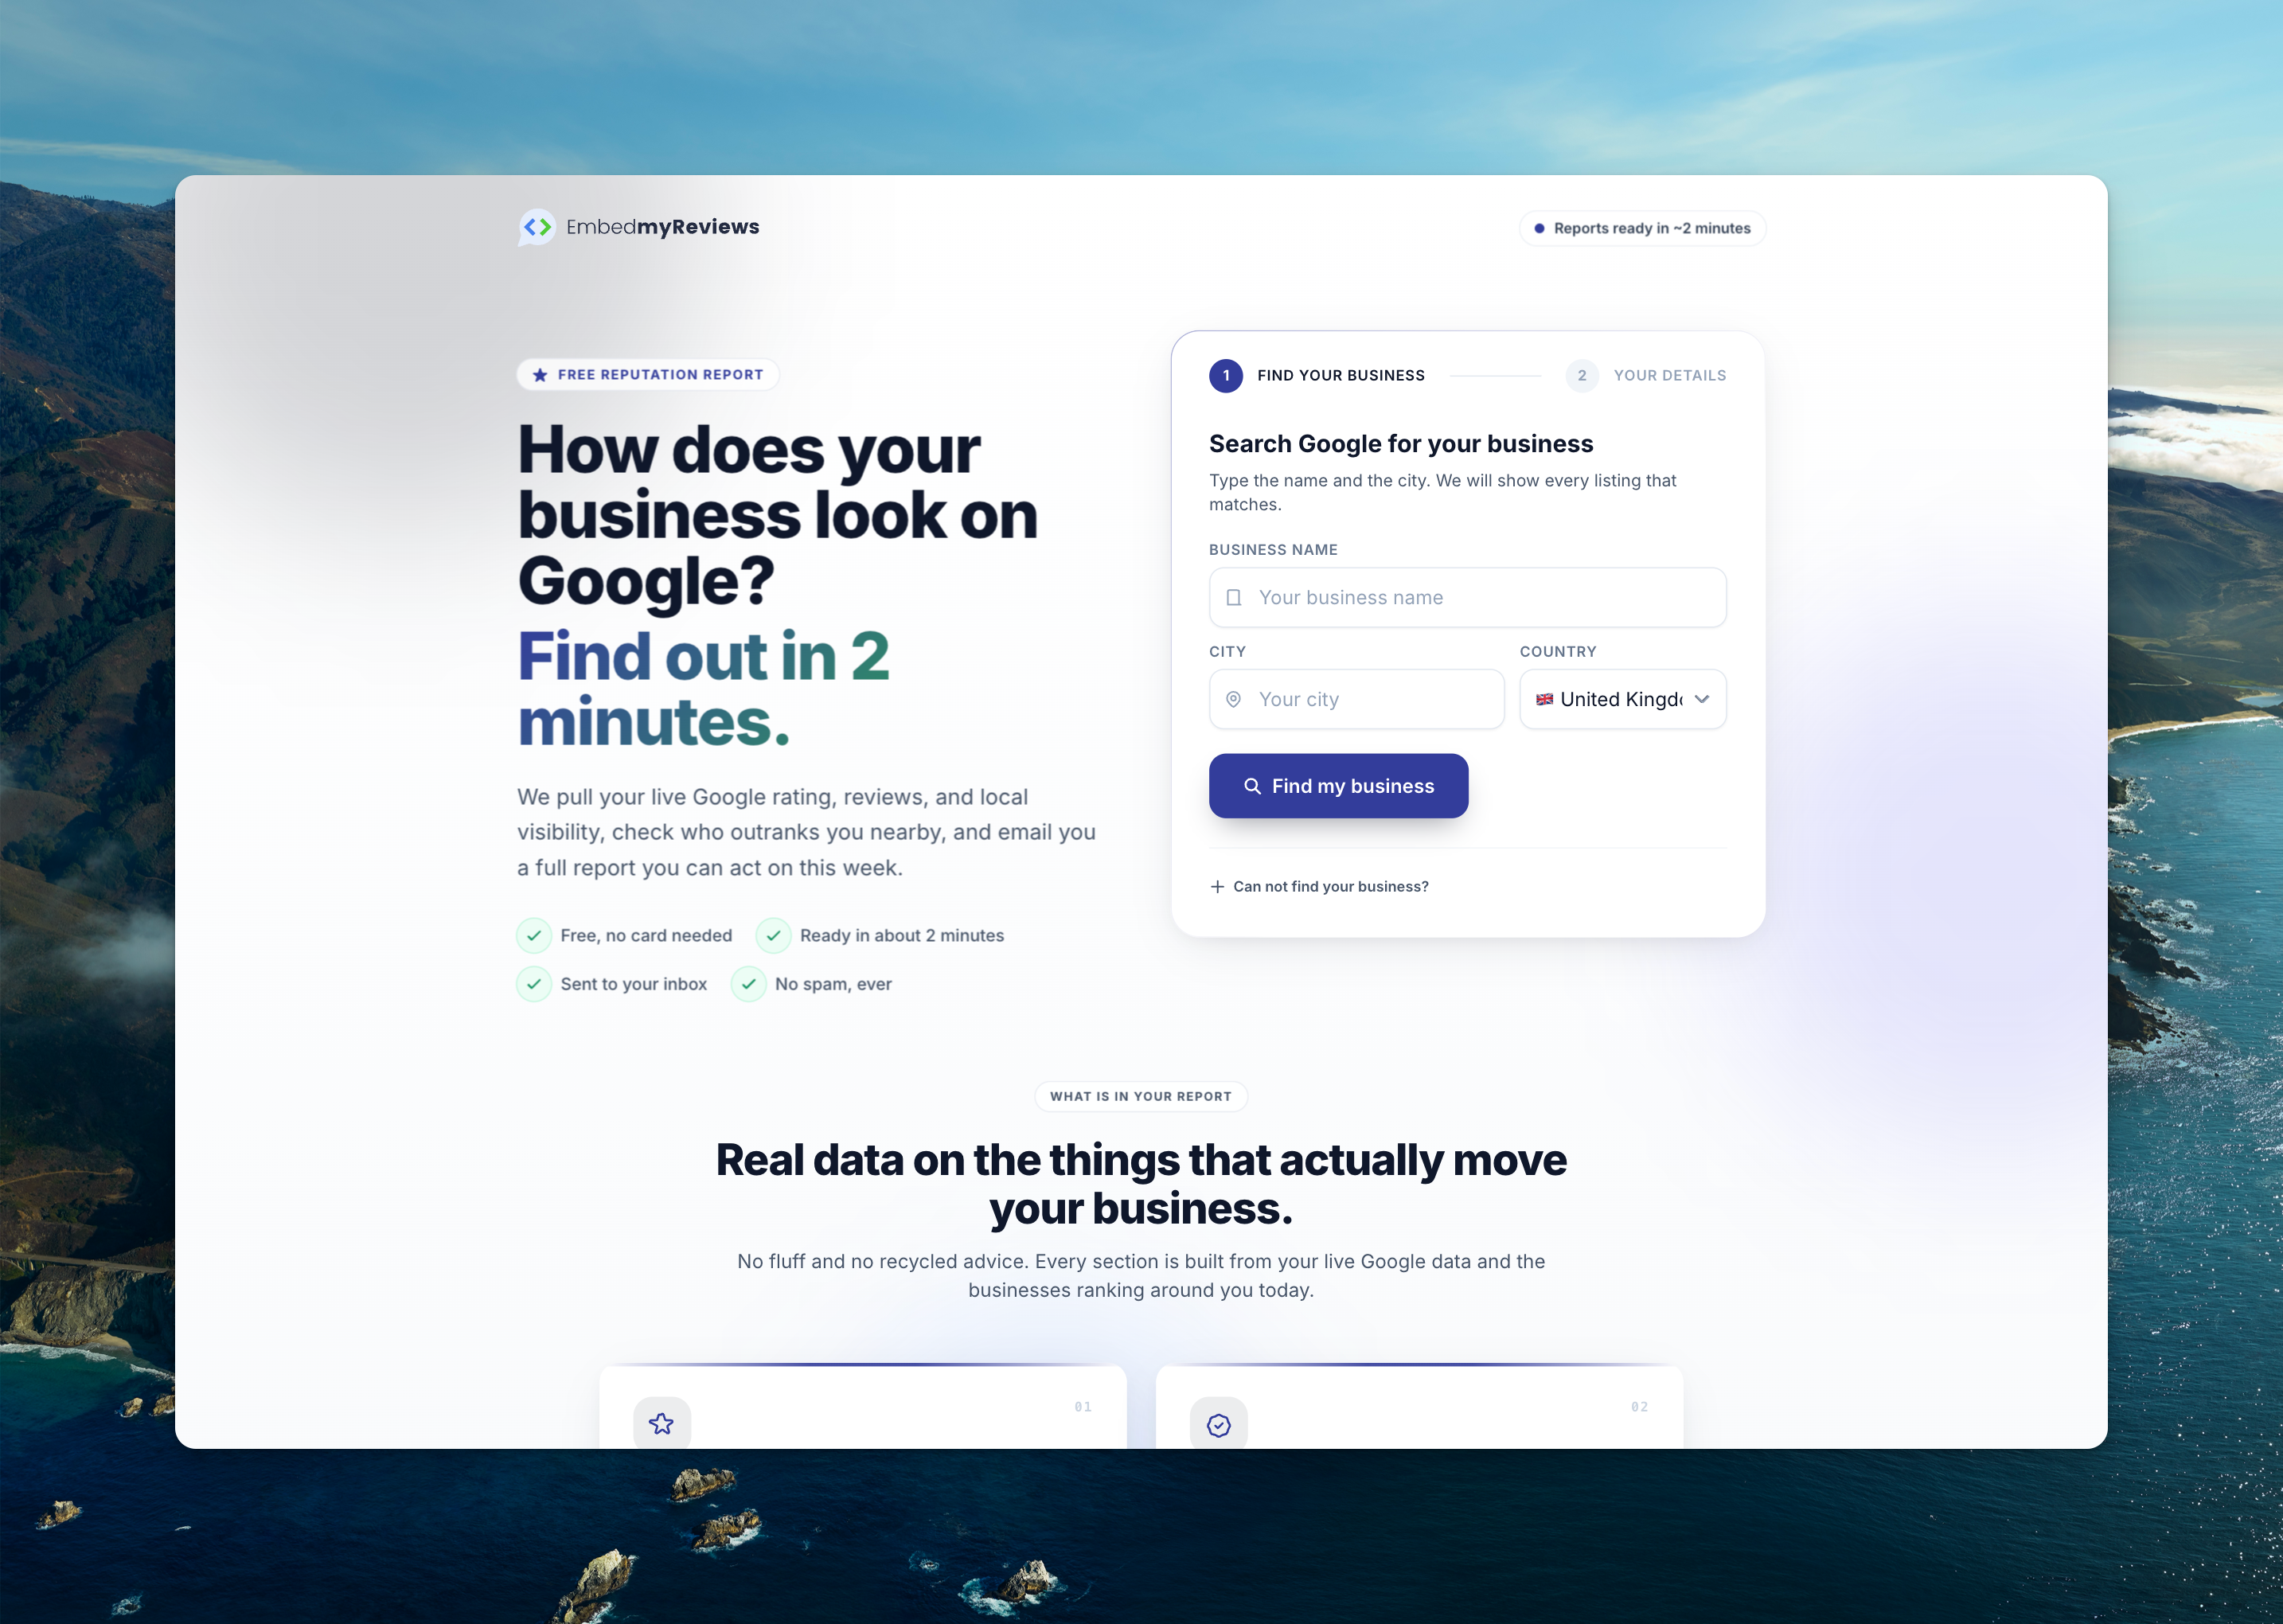
Your prospects can now request their own Sales Intelligence report from a public page on your domain. They enter their business details, pick their location, hit submit, and a full report is generated and emailed to them automatically. You get the lead in your pipeline before they have even spoken to you.
What you can configure on the public form:
Headline, subheading, intro copy, FAQ section and button labels, all editable in every language you serve
Up to four trust badges and five FAQ entries written in your own words
Required fields (phone, role, consent) and your own consent statement
A country allow list so only the regions you sell into can submit
Optional Cloudflare Turnstile to keep junk submissions out
Daily and hourly submission caps per email, per IP, and per tenant
Notification emails for your sales team when a lead lands
A custom call to action at the end of the report that points wherever you want (book a call, pricing page, calendar link, anything)
You also choose what depth of report your prospects receive. Pick the lighter "budget" version to keep costs predictable on cold traffic, or the full version with AI visibility included. You can even hide the AI visibility section from the lead so it stays as ammunition for the sales call.
Prospects land on a live status page while their report runs so they stay engaged, then receive a polished "your report is ready" email with your branding on it.

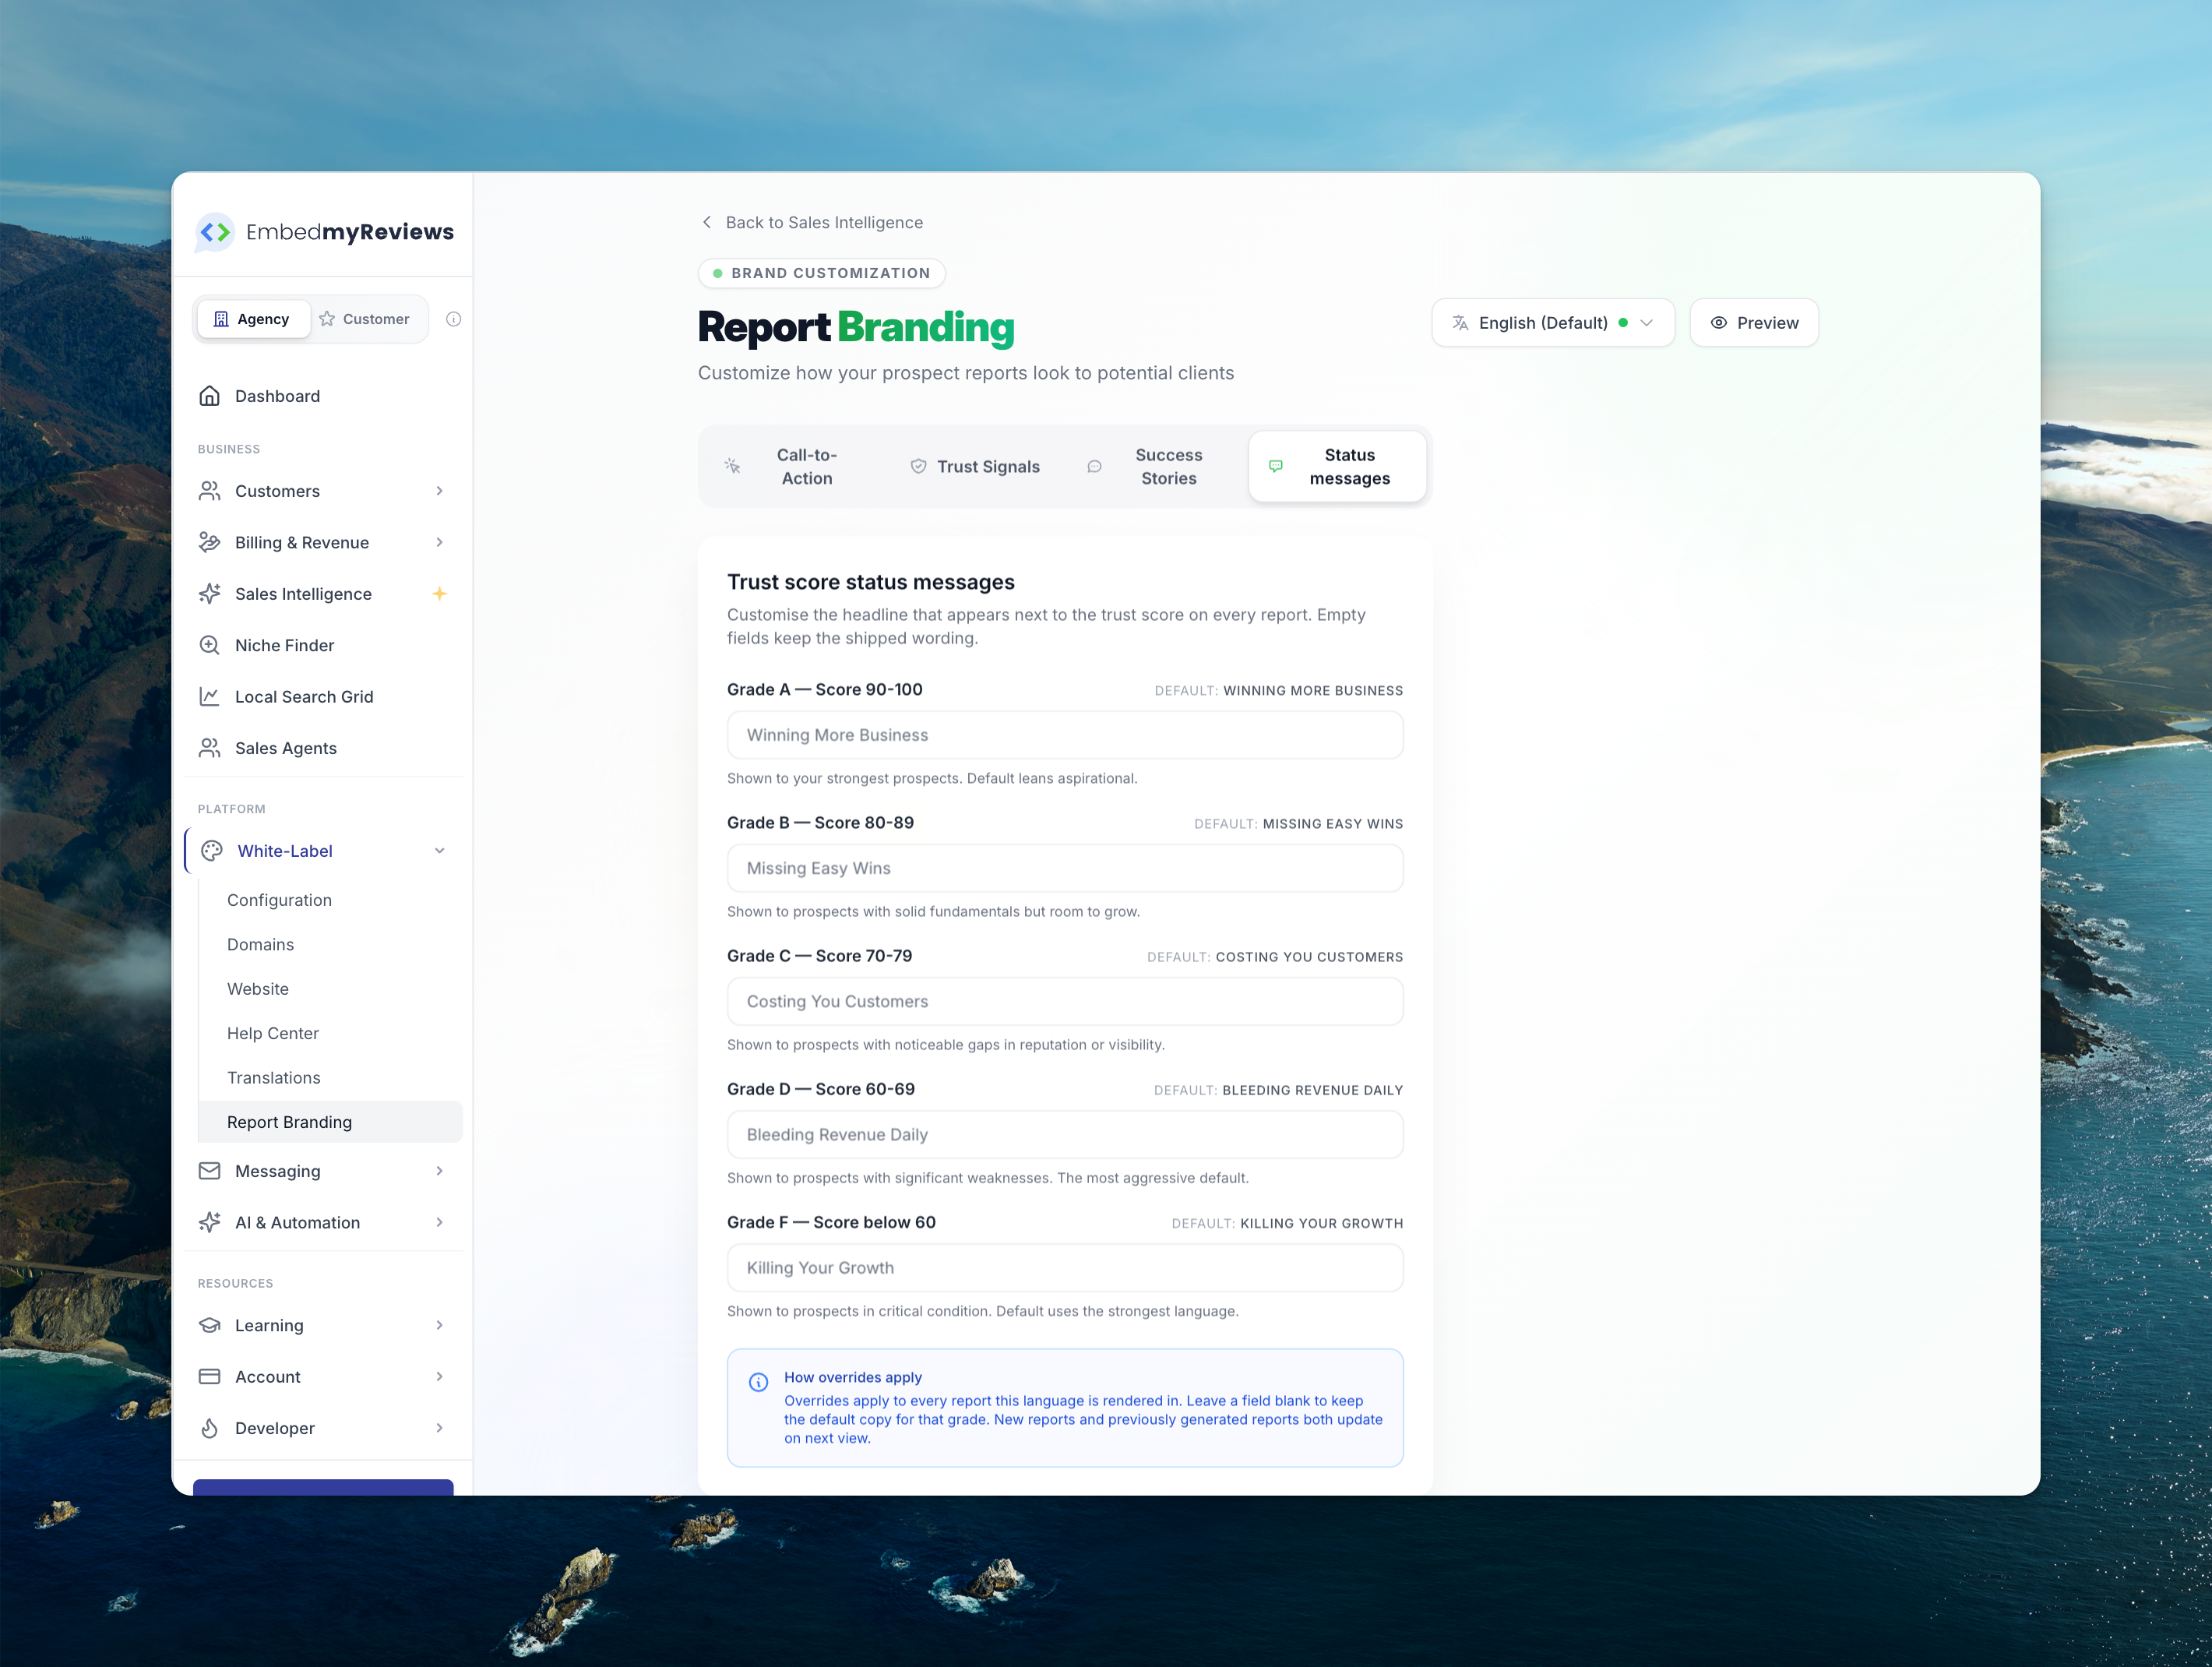
Custom Report Status Messages (Override The Headline)
You can now override the report headline that sits next to the trust score on every Sales Intelligence report. The defaults shipped from us are deliberately punchy ("Bleeding Revenue Daily", "Killing Your Growth", "Costing You Customers"), but plenty of agencies wanted their own tone. You can now rewrite the line for each grade (A through F) and for each language you operate in. Leave any field blank and the default still applies.
This applies to brand new reports and to previously generated reports the next time they are viewed, so your wording rolls out everywhere instantly.
LLM Visibility Brought Up To Search AI Standard
The AI visibility section inside Sales Intelligence reports has had a serious quality lift. It now uses the same depth of checking as our standalone Search AI product, including proper web search, a second pass to verify borderline mentions, and clear handling for the cases where an AI refuses to answer or hits an error (no more silently counting a failed check as a miss against your prospect).
This is the most accurate AI visibility data you can show a prospect anywhere in the industry. Worth flagging that this depth of analysis costs more per report than the previous engine. If you want to keep spend low on top of funnel leads, the new Budget mode toggle on the generate report screen turns these heavier checks off and gives you roughly a sixty percent cost saving per report. Use the full version for warm prospects, budget for cold ones.
Local Search Grid Updates
A handful of real improvements for agencies running rank tracking at scale:
Archive and restore scans without losing history, which frees up your active scan slots and stops the cron running on scans you have paused
Edit an existing scan's location, keywords, or grid geometry instead of deleting and rebuilding
New endpoint for pulling per pin data, ideal for piping results into your own dashboards or rank tracker
Bulk scan creation is now staggered automatically when you submit more than five at once, so DataForSEO stops dropping pin results under load
Faster, lighter API responses by default, with the ability to trim how many competitors are returned per pin
The same capabilities are also exposed to our MCP tooling so anything connected via that route gets the new endpoints too.
Lead Capture API And MCP Tools
Every lead that comes through the public form lands in your leads list. To get those leads into your stack:
Two new webhook events you can wire up to Zapier, Make or your own systems: one when a lead is captured, one when their report finishes
A proper agency API for listing and pulling individual leads
Equivalent MCP tools so any AI assistant you have plugged into your stack can search and read your leads
Report Generation Quality Of Life
New language override on the generate report screen, useful for places like Belgium, Switzerland or Canada where the country and the prospect's language do not line up
Custom keyword field for the local search grid section of the report
Tighter, plainer English across the report itself, replacing internal jargon ("local pack", "traffic") with language a prospect actually understands
New podium captions for cases where the leaderboard winner is not the literal top result on Google Maps
Twenty six additional languages now have full report translations, including Arabic, Japanese, traditional Chinese, German, French, Spanish, Italian, Portuguese (both flavours), Dutch, Polish, Turkish and the Scandinavian languages
Guest language switcher now remembers the chosen language across pages properly
Fixes Worth Knowing
Reports no longer count a failed or refused AI check as a "didn't mention you" against the prospect
ChatGPT visibility checks were occasionally skipping web search and inventing answers on the older model. That has been replaced and old credentials are upgraded automatically
Webhook subscriptions are now correctly limited to tenant owners, not customer or sub user tokens
Sales Intelligence reports generated through the self serve flow can no longer be opened on the deep "Full Analysis" URL by the lead, keeping that view for your sales conversation
Various smaller cost estimator, status page and rate limiting fixes
In Short
If you sell reputation management, get the public form live on your site. Edit the status message headlines to match your voice. Pick the right report depth for the right traffic. The rest of this release is there to support those three decisions.
May 12th, 2026
A rundown of what's shipped over the last few weeks. Skim it, share what's useful with your team, and pass the highlights along to customers where it makes sense.
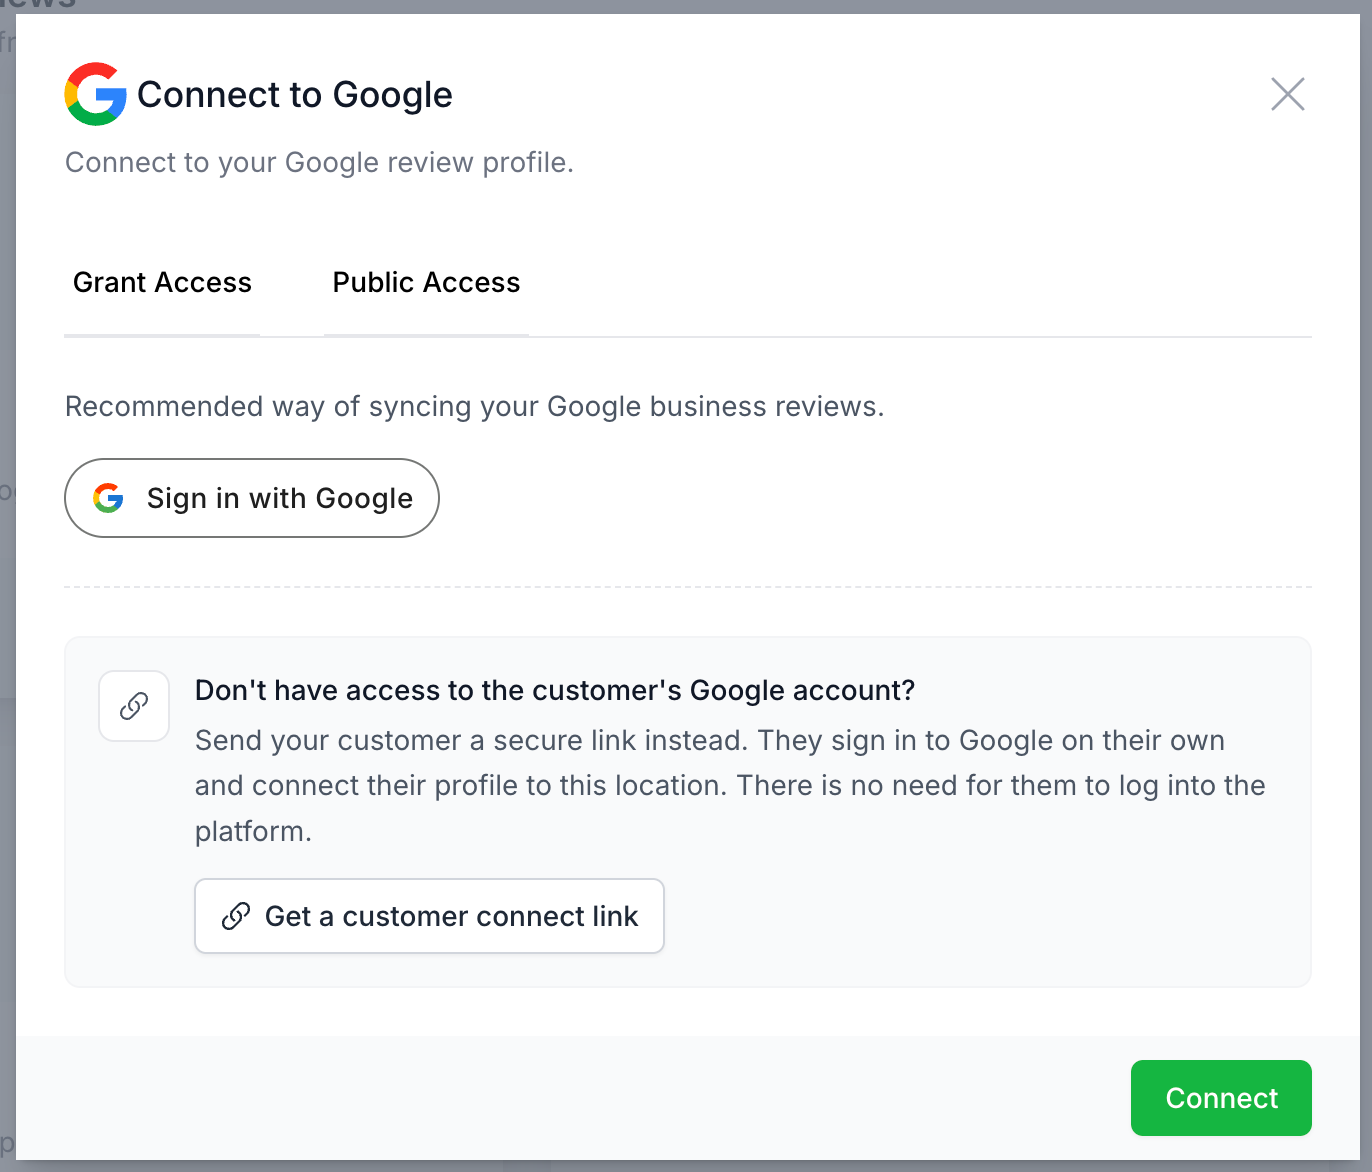
Customer Connect Links for Google & Facebook
You can now send a customer a tokenised link that lets them log in with their own Google or Facebook account and connect their Business Profile or Page on their own. They never need an account on the platform or need to sign-in. The flow has its own landing page, success screen, and expired-token screen, and the invitation can be sent by email straight from the customer modal or via the agency Customers API.
Arabic Language Support
The platform now ships a full Arabic translation (admin UI, campaigns, widgets, feedback forms, customer-facing pages) along with a right-to-left stylesheet so layouts flip correctly.
Smarter White-Label Theming
Brand, primary, and secondary colours now compute a readable text colour automatically based on contrast, so white text no longer disappears on light brand colours. Agencies can still override the text colour for each of the three brand colours from the theme form if they want full control.
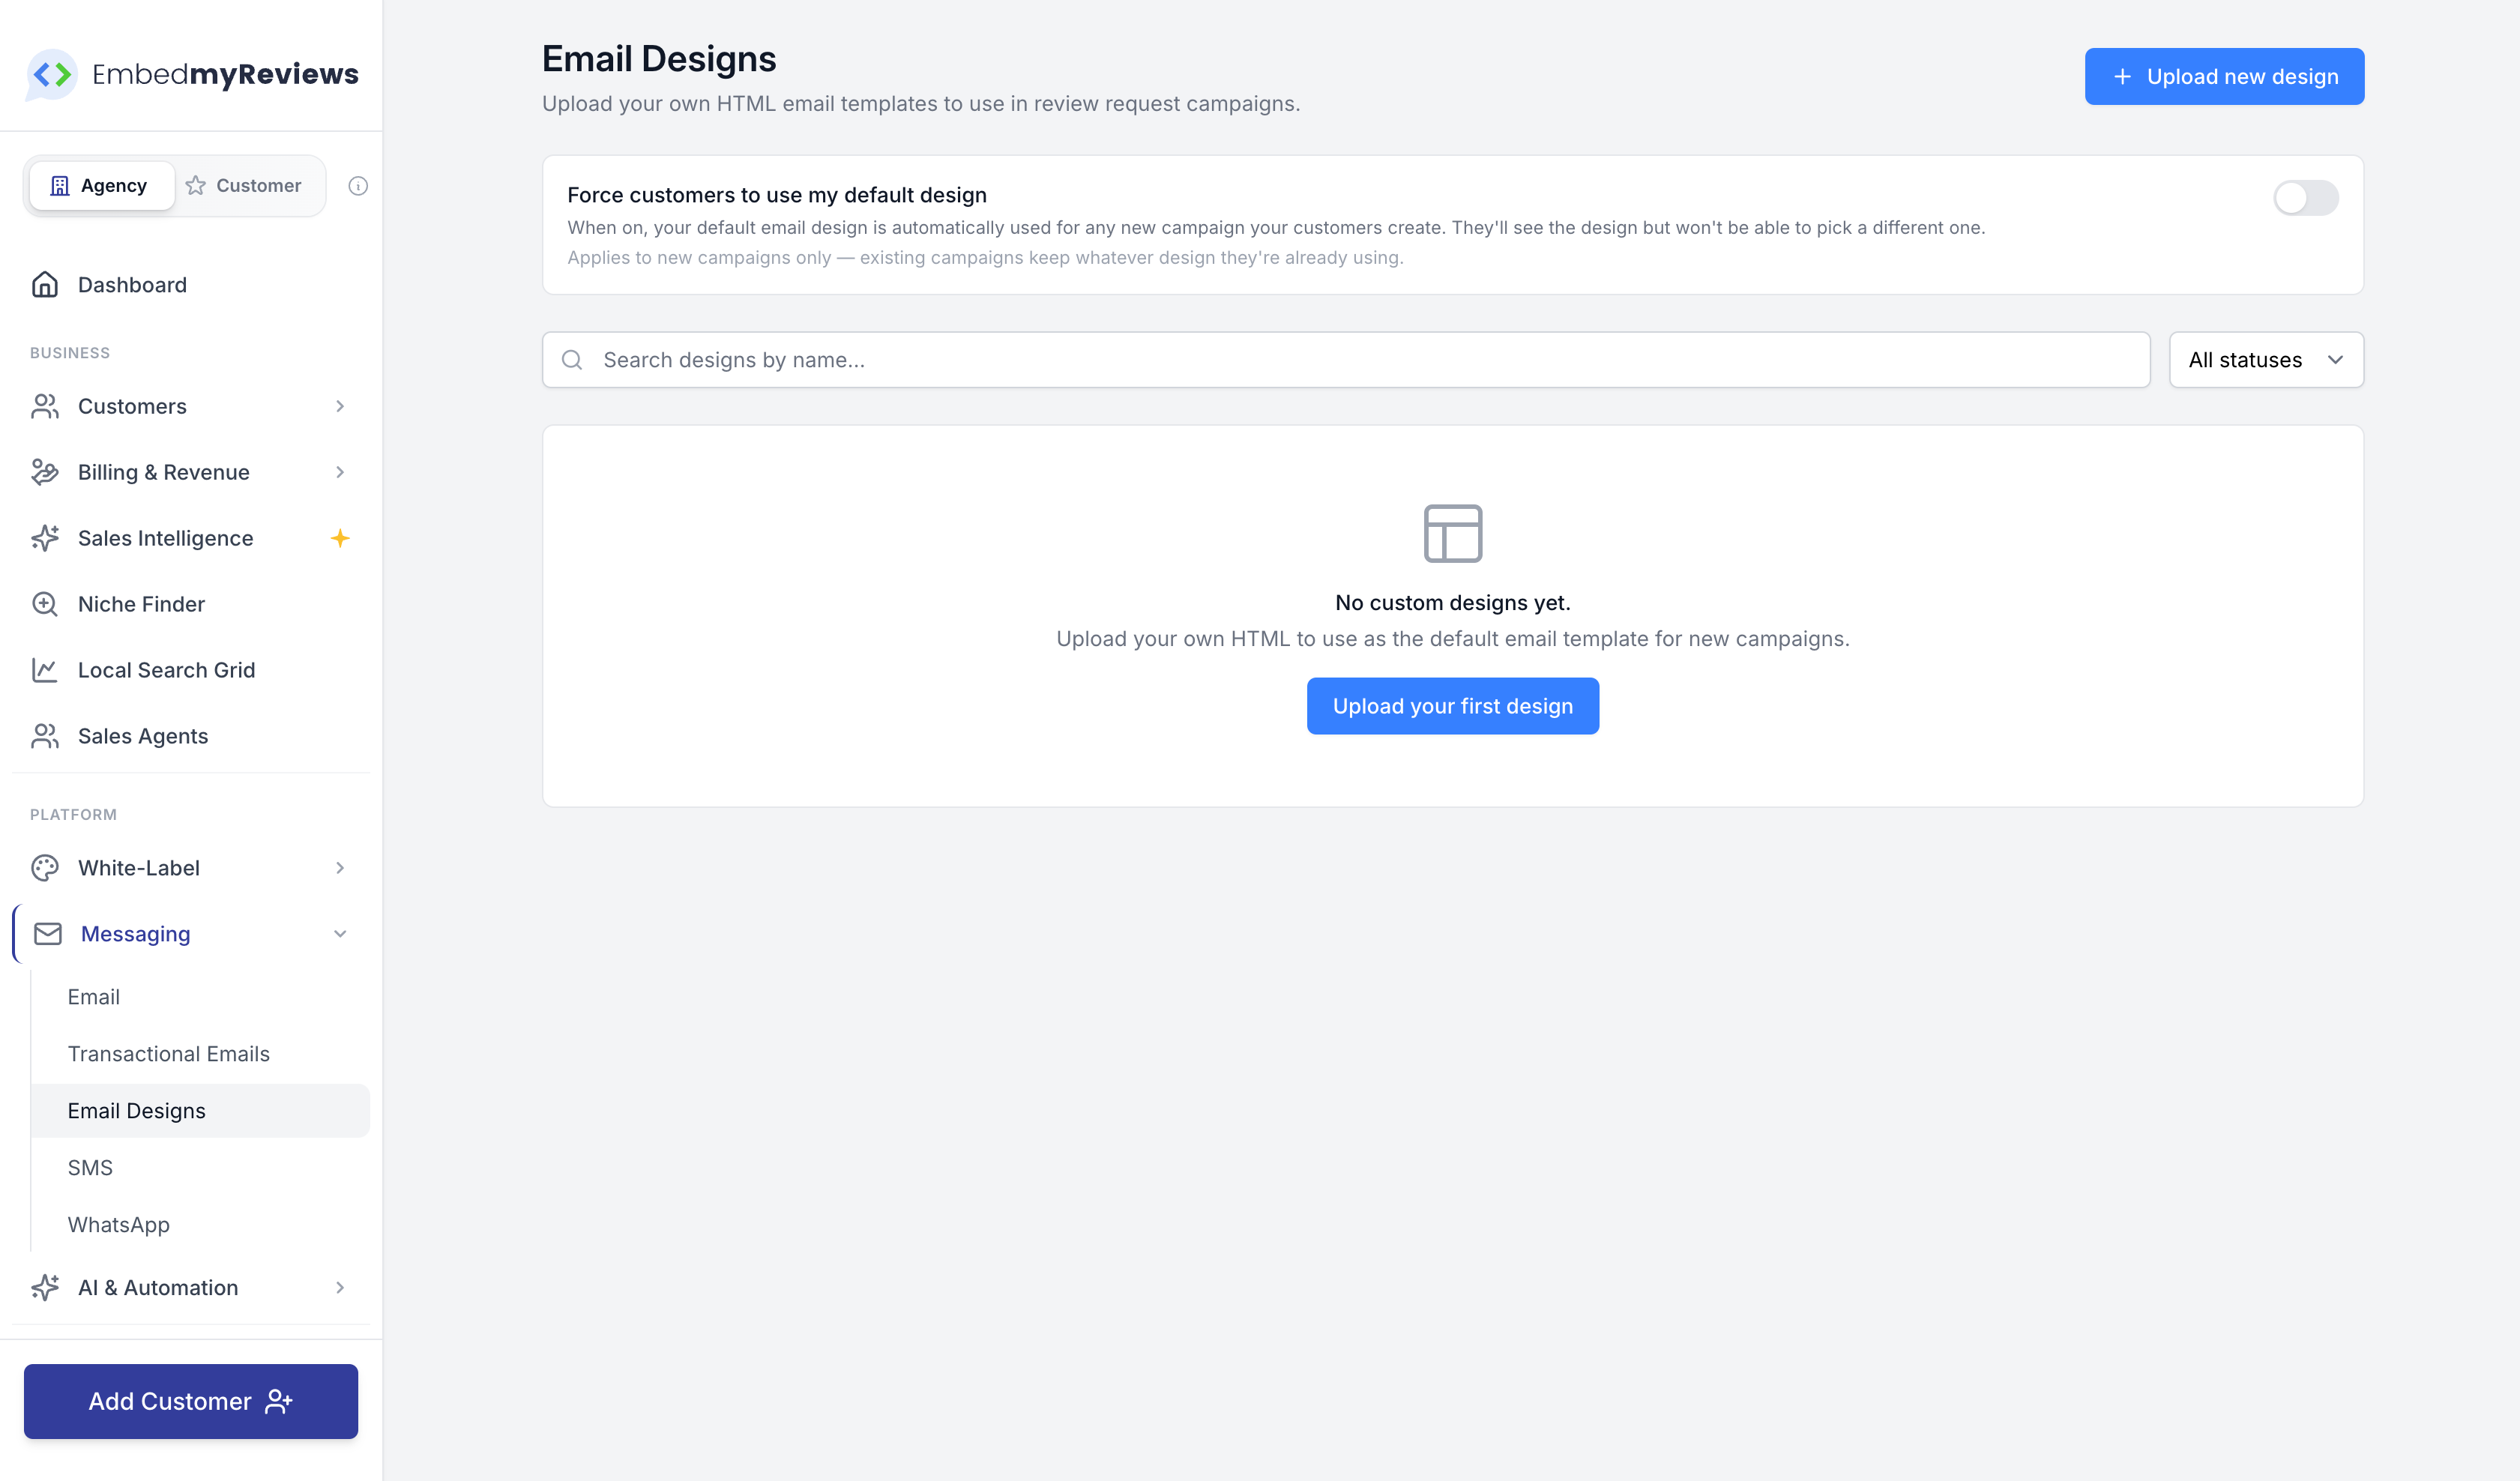
Custom Email Designs
Agencies can upload their own raw HTML email templates and use them in campaigns. There's an upload/validate/preview flow, a token catalogue for merge fields, and an HTML sanitiser so bad markup can't slip through. Templates show up in the campaign builder template grid alongside the built-in ones.
Campaign Builder Reorganised
The campaign builder has been restructured into clearer tabs (Setup, Content, Appearance, Advanced) with separate sections for email, SMS, and WhatsApp channels and sub-sections inside email for sender info, subject and heading, message, CTA, footer, theme, and branding. Same features, easier to find things.
Edit Customer From Customer Manager
There's a new edit modal on the Customer Manager that lets you update a customer's name, email, phone, and language without leaving the page. Other fields (Organization details, Stripe customer) are intentionally left alone to avoid drift.
Google Business Profile: Search Keywords
GBP search keyword performance is now pulled in and surfaced on the customer dashboard and the agency customer dashboard. It shows how many people found a location with branded versus non-branded searches each month, with a configurable list of brand aliases so you can tune what counts as branded.
Connecting Thousands of Google Locations
The Google location picker now pages through results progressively with a one-hour cache, so connecting accounts that own thousands of locations no longer times out.
Facebook Sync Fix
Facebook review syncs were sometimes ending early when a page of results contained no reviewable items, even when more pages were available. The sync now walks the pagination directly instead of relying on the SDK helper, so you should see more complete history coming through.
Stripe Checkout Customisation
Stripe Connect account settings now expose options to collect the company name on checkout, require Terms of Service consent, and set a custom submit-button message. Tax ID collection is also wired in for subscriptions when the tax flag is enabled.
Local Search Grid as an Agency API
Local Search Grid scans are now driven through a proper REST API for agencies. You can create, list, run, schedule, and pull snapshots and insights for scans. There's a separate customer-facing API for GBP metrics and search terms too. Full reference is on the public API docs at https://www.embedmyreviews.com/docs/api/. Behind the scenes, scans now run on their own queue so they don't slow down notifications, exports, or other jobs.
MCP Tools for AI Assistants
If your customers connect Claude, ChatGPT, or another MCP-compatible assistant, the assistant can now run Local Search Grid scans, list and inspect scans and snapshots, view scan insights, and pull GBP metrics and search terms. Tools are visibility-gated so customers only see what they have access to.
Search AI Improvements
The Search AI scan pipeline has been reworked so the dashboard shows a processing state straight away when a scan starts, and per-query runs are handled better. Mention extraction, response classification, and the platform query executor have all been expanded for better quality results.
Social Image Builder
A new Social Template Onboarding Blueprint type lets agencies snapshot a social image design and have it automatically created inside every customer's account when a review source is connected. There's also a new shared tab navigation across the AI Insights, Reviews, Search AI, and QR analytics dashboards so getting between them feels consistent.
Widget and Feedback Form UI Refresh
The Collect Reviews and Display Reviews pages have been rebuilt with a cleaner card layout, better previews, and a tidier toolbar. Same actions, refreshed look.
Integration Manager Slide-Over
The "more info" modal on the Integration Manager has been replaced with a proper details panel. For direct-collection sources like Testimonials there's now a dedicated stats panel inline. TripAdvisor connections also now show a properly humanised listing name (for example "The Plaza, New York City") instead of the raw URL slug.
Custom Plan Fixes (Agency Feedback)
A handful of fixes from your weekly calls:
Custom plan prices now format in the agencies actual currency.
When switching a customer's plan, hidden and grandfathered plans now show up so you can move them onto those.
Add-on location billing confirmation pricing now formats correctly.
SMS & Twilio Fixes
Inbound and delivery-status Twilio webhooks were silently failing because the webhook handler was reading the wrong field shape from our internal data object. That's fixed, so STOP/START handling and message statuses come through again.
Toll-free verification cancel flow no longer leaves the SMS compliance wizard stuck on "Needs Verification" when a agency verifies their number directly in Twilio.
Twilio compliance review URLs now always use the agencies fallback subdomain instead of any custom domain they may have set, so Twilio's reviewers don't hit a dead link if a customer later changes their domain.
Email Send Errors
Some failed sends were not surfacing their actual error. The mail action now propagates failures properly so you see what went wrong instead of a silent miss.
That's the lot. Let us know if there's anything you want pushed up the priority list for the next round.
April 22nd, 2026
We've added a new way to get answers out of the platform. Instead of opening the dashboard, exporting a CSV, or pasting screenshots into an AI tool, you can now plug Claude Desktop, Cursor, ChatGPT, or any compatible AI assistant straight into your live review data. Ask a question in plain English and the AI pulls the answer from the same database you see in the dashboard.
It's included in your plan at no extra cost and is 100% white-label, so your clients see your agency branding, not ours.
What this actually is
The AI Hub is a small connector built into every agency workspace. AI assistants like Claude and Cursor can speak to it using an open standard called the Model Context Protocol (MCP). You don't need to understand the standard. All you need to know is that modern AI tools can now use your review platform as a working tool instead of a copy-paste surface.
You create a connection in the dashboard, paste a small config snippet into your AI client, and that's the setup done.
What your team and your clients can actually ask
These are real questions you can ask once the connection is live. The AI decides which tools to use and returns a clean answer.
For your agency team
"Summarise last month's reviews for Acme Dental and pull out the three most common themes."
"Which of Acme's 14 locations has the lowest response rate? Show me the unanswered 3-star reviews at the worst one."
"Compare the open and click rates of the October campaign with the July one."
"Show me every client who doesn't have an auto-respond rule set up. That's my upsell list."
"Draft a reply to review 8421 in the voice of the clinic owner and hold it for my approval."
"Tag every review that mentions wait times with 'wait-time-issue' so I can filter for it later."
For your clients (when their plan allows API access)
"How many 5-star reviews did I get this week? Which locations got them?"
"What are customers complaining about most this month?"
"Did that recent email campaign actually get reviews or just clicks?"
"Show me the private feedback from the last 20 customers who filled out my form."
Every answer comes from the live database, not a stale export.
How to get started
Three quick steps. Under a minute if Claude Desktop or Cursor is already installed.
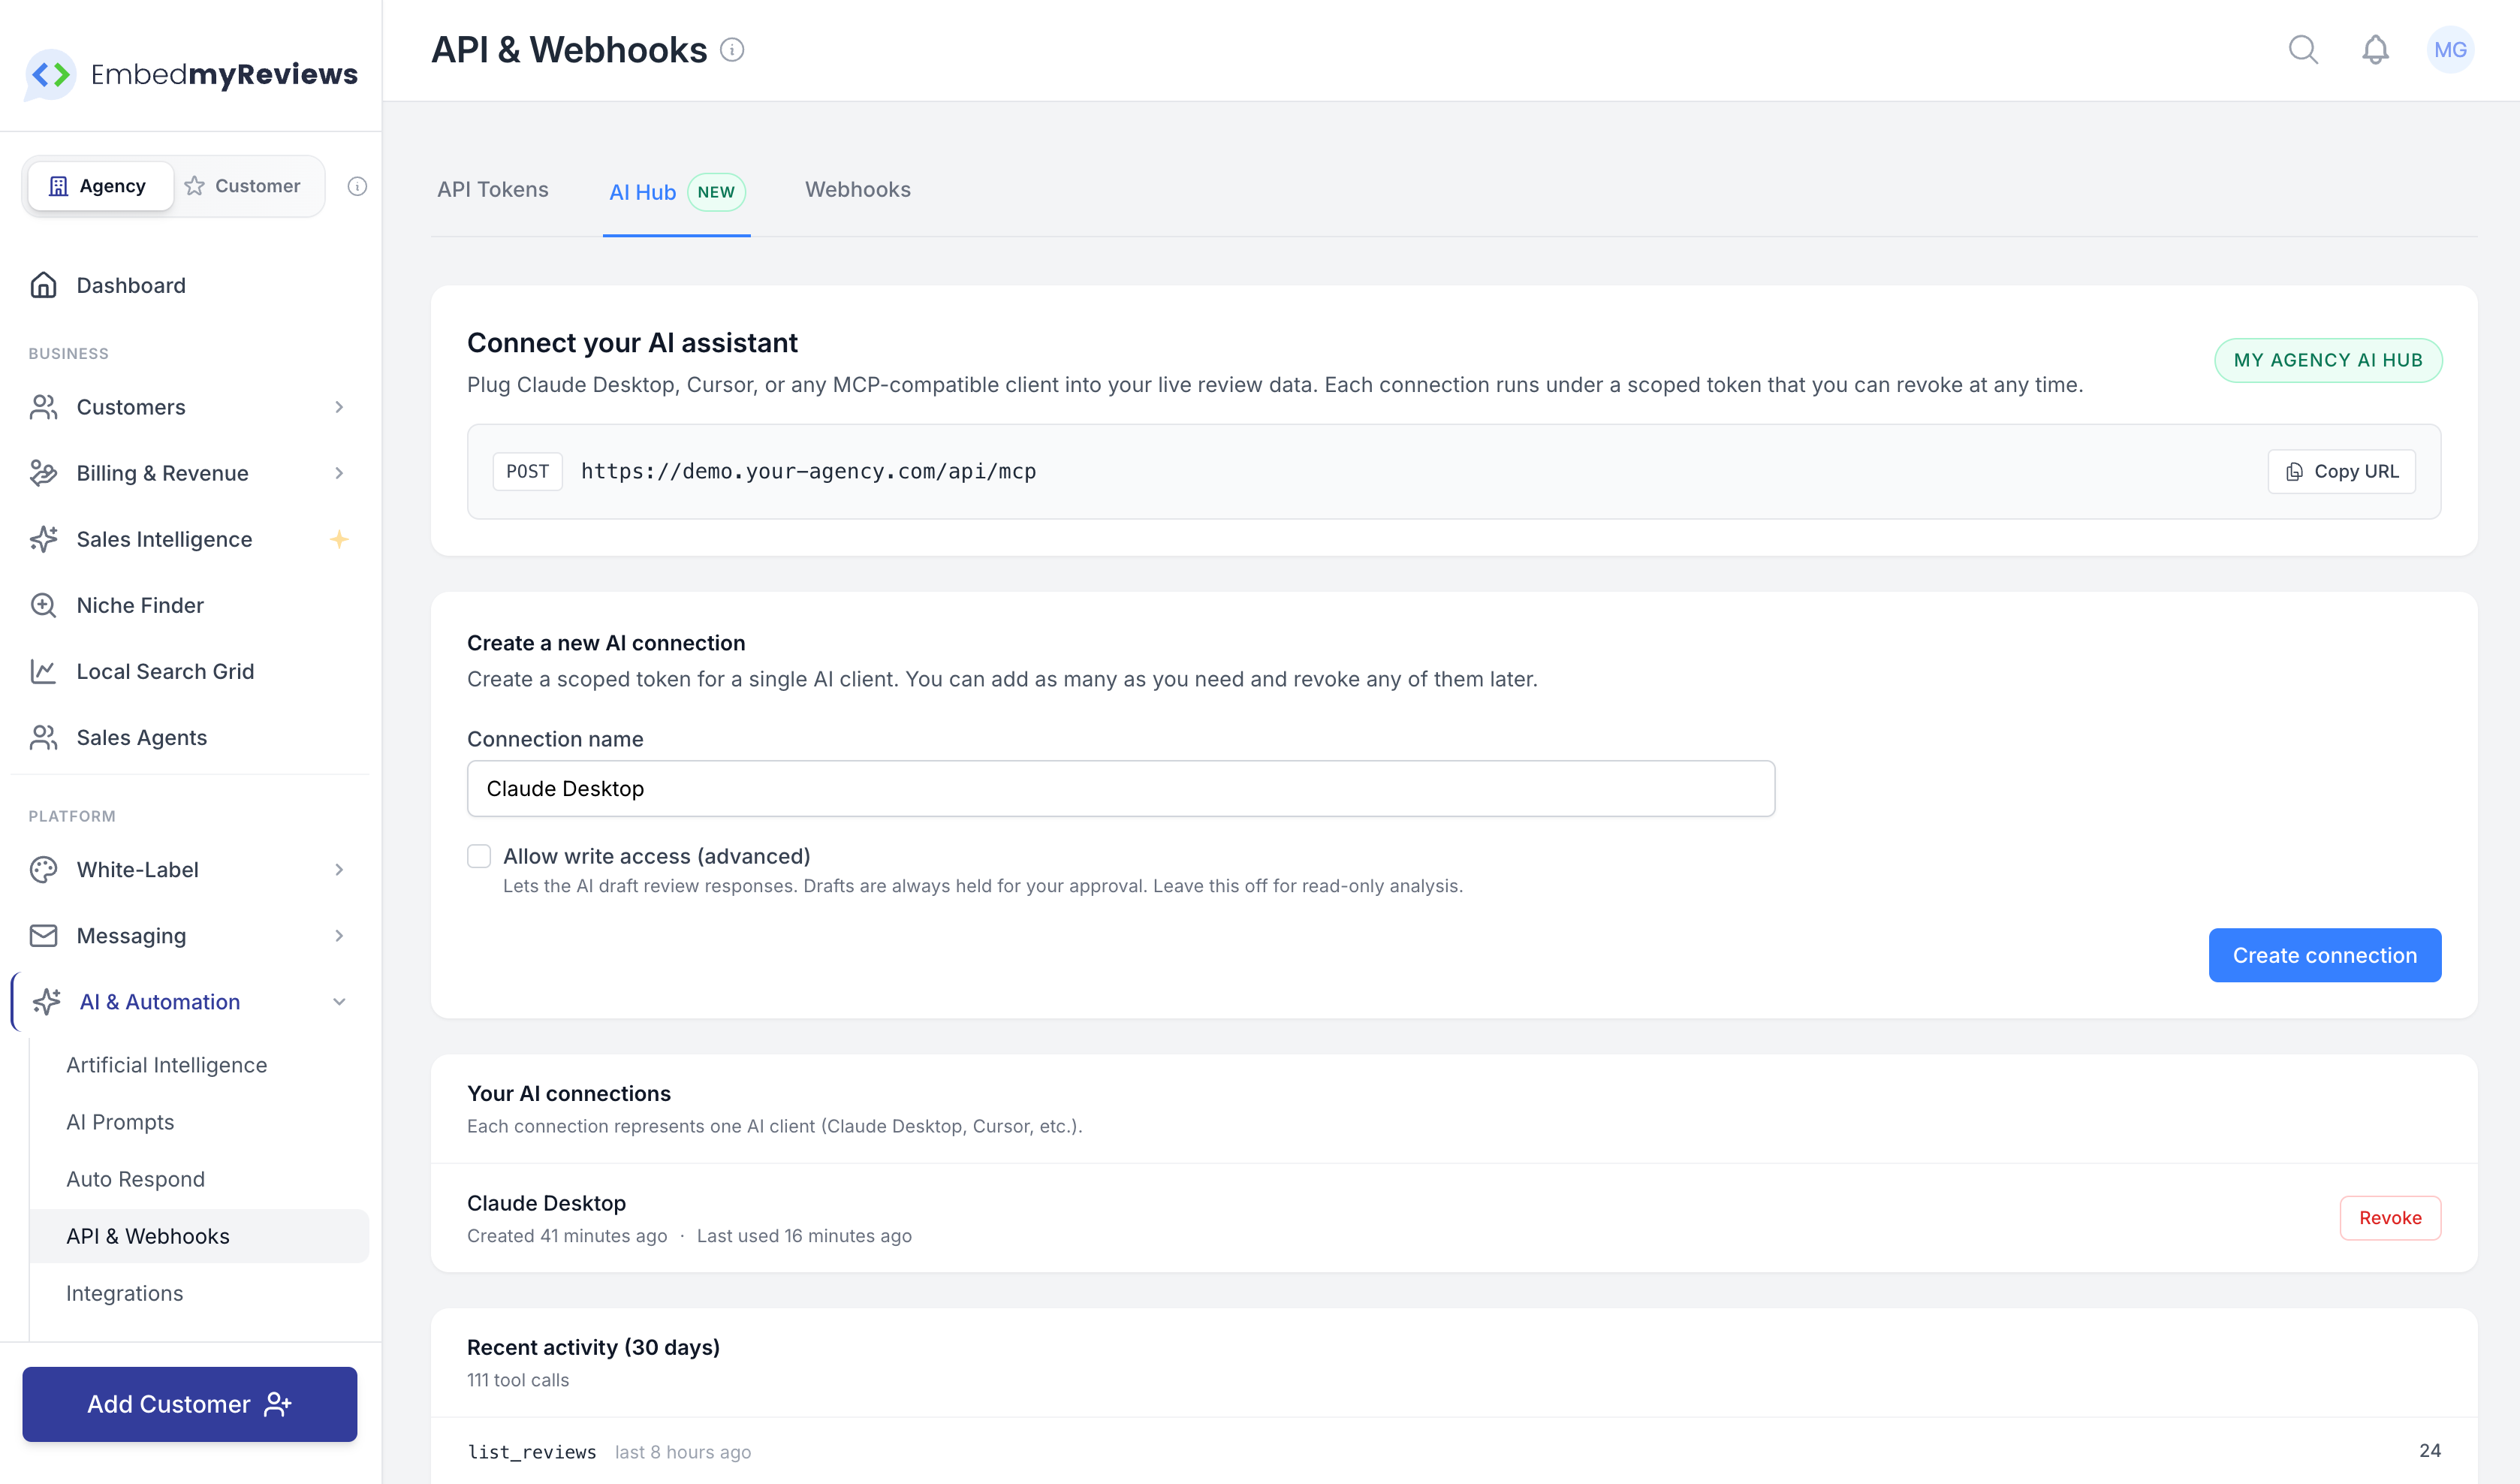
1. Open the AI Hub in the dashboard. Go to Settings then AI Hub. There's also a shortcut under Settings then API & Webhooks on the Connect AI tab.
2. Create a connection. Click Create connection and give it a name that tells you which AI tool it belongs to, for example Claude Desktop. If you want the AI to be able to draft review responses (which are always held for your approval, never auto-sent), tick the Allow write access checkbox. Leave it off for a pure read-only connection. Click create.
3. Paste the config and restart. The dashboard shows a ready-to-paste snippet and the bearer token. Copy the whole block, open your AI client's MCP settings (in Claude Desktop that's Settings then Developer then Edit Config), paste, save, and restart the client. That's it.
The token is shown once at creation. Copy it straight away. If you lose it, just revoke that connection and create a new one.
You can create as many connections as you need. One for Claude Desktop, one for Cursor, one for your VA, one for an automation. Each one is its own token and can be revoked independently without affecting the others.
Which AI clients work with it
Any AI tool that supports the Model Context Protocol. That currently includes:
Claude Desktop
Claude Code
Cursor IDE
VS Code with Copilot Chat
ChatGPT custom connectors
The setup is the same for all of them: paste the snippet, restart, done.
Where to find everything in the UI
AI Hub dashboard at
SettingsthenAI Hub. This is where you monitor usage, view logs, browse the tool catalog, and see which of your connections are active.Create and manage connections at
SettingsthenAPI & Webhooks, then the Connect AI tab. You can also open it straight from the AI Hub dashboard.Developer documentation under your white-label API docs. The MCP section sits alongside the REST API and covers the endpoint, authentication, tools, and error codes for anyone on your team who wants the technical details.
Watching what the AI is doing
Every tool call is recorded. Nothing is hidden.
Open Settings then AI Hub to see:
Total calls, average response time, active callers, and issues across the time range you pick (last 24 hours, 7 days, 30 days, or 90 days).
Call volume chart showing one bar per day so you can see activity spikes at a glance.
Tools used breakdown listing every tool that's been called, how many times, average response time, and error rate. Click a tool to filter the audit log below to just that tool.
Audit log with one row per call showing when, which tool, which connection called it, success or denied or error, duration, and how many rows came back. You can filter by date range, by tool, and by status.
Tool catalog reference showing every tool your AI clients can see, grouped by risk level, with its required permission.
For each call, parameters are recorded with tokens, emails, and phone numbers stripped out, so the audit log never becomes a private data surface. Calls older than 90 days are cleaned up automatically.
Who can use the AI Hub
You (the agency owner) have it on by default.
Your team members need the API access permission and the AI Hub permission on their role. You control this in your team settings.
Your clients can get it too, but only if the plan you sold them includes API access and the AI Hub permission. This means you can choose to offer AI Hub access as an upgrade feature on premium plans, or include it everywhere, or hide it entirely. It's your call, set per plan.
Safety features, because AI is still new
The AI Hub is designed to be safe to point a third-party AI tool at. The protections are on by default.
Read-only by default. A fresh connection can query data but cannot change anything. You have to tick the "Allow write access" checkbox when creating the connection to enable writing.
Write tools never auto-send. When the AI drafts a review response, it lands in your existing Auto-Respond approvals queue with the "awaiting approval" status. It does not reach Google or Facebook until a human clicks approve. Same protections as the rest of the platform.
Private customer information is redacted by default. Names, email addresses, and phone numbers on private feedback and contacts are hidden unless you specifically create a connection with PII access. Even for your own tokens, both the permission and an explicit opt-in on each call are required before any PII leaves the server.
Scoped to what the token owner can see. If a team member's role is limited to certain locations, any AI connection made by that person can only see those same locations. Same access rules as the dashboard.
Rate limited. 120 calls per minute per connection, 600 per minute across your whole workspace. A misbehaving AI client can't hog the platform.
Revocable in one click. Each connection is its own token, so if something feels off you revoke that one and every other connection keeps working.
White-label
Everything in the AI Hub lives on your domain. The endpoint is https://app.your-agency.com/api/mcp. The server name that your AI assistant sees uses your company name. The config snippet, the audit log, the dashboard, and the API docs are all your branding. Your clients never see our brand anywhere in the flow.
What's included, and what AI usage costs
The AI Hub is included in the $99 per month plan at no extra cost. There's no per-call fee and no per-token fee from us, and no separate AI Hub pricing tier.
The only variable cost lives on your AI client side. When Claude Desktop or Cursor makes a call using the Anthropic or OpenAI model it's running, you pay your AI provider directly for that model usage, the same as any other conversation with that tool. Usage is typically fractions of a penny per question.
What's in the toolbox today
Thirteen tools ship in the first release. In the dashboard's Tool Catalog you'll see each one grouped by risk level.
Read tools (seven)
List and filter reviews across organisations, locations, sources, dates, ratings, sentiment, response status, and full-text search
Fetch a single review with its reply, tags, and auto-respond history
List organisations with review count and average rating
List locations with review count and average rating
Aggregate metrics over a date range with optional grouping by day, week, month, location, organisation, source, rating, or sentiment, and with period-over-period comparison
List review-request campaigns with their status, schedule, location, and full funnel (invited, opened, clicked, reviewed, redirected, testimonials submitted, private feedback, unsubscribed, bounced) plus conversion and engagement rates
Retrieve existing AI Insights analysis for an organisation or location
Read tools with access to private data (four)
List private feedback submissions (PII redacted unless both conditions above are met)
List review-request contacts with their subscription state, latest activity, and engagement counters
Fetch the full activity timeline for one contact, showing every invite, open, click, video play, redirect, testimonial, private feedback submission, unsubscribe, bounce, and spam complaint
List configured auto-respond rules
Write tools (two, always held for approval)
Draft a response to a review. Always goes to the Auto-Respond approvals queue first.
Attach or detach tags on up to 50 reviews per call for theme clustering.
More tools will land over time. You don't need to do anything for new tools to show up for your connections.
Where to read more
Feature overview at
/features/ai-hub-mcp-serveron your public siteFull setup walkthrough in your documentation under
AI Features, titledAI Hub (MCP Server): Setup & UsageAPI reference in your developer documentation, in the
AI Hub (MCP)section alongside the REST API reference
In one line
Your clients' review data, connected to the AI tools your team already uses, running under your brand, with every call logged, PII protected, and write actions held for human approval. Included in every plan.
April 9th, 2026
Twilio setup has been one of the biggest friction points for agencies, especially in the US and Canada where toll-free verification and SMS compliance can quickly turn into a mess.
This update is focused on making that process much easier inside EMR.
If you have dealt with A2P, 10DLC, toll-free verification, or unclear compliance requirements before, you already know how frustrating it can be. Slow approvals, inconsistent feedback, confusing wording, and too much guesswork.
This release is designed to remove as much of that friction as possible while keeping your setup aligned with what Twilio expects.
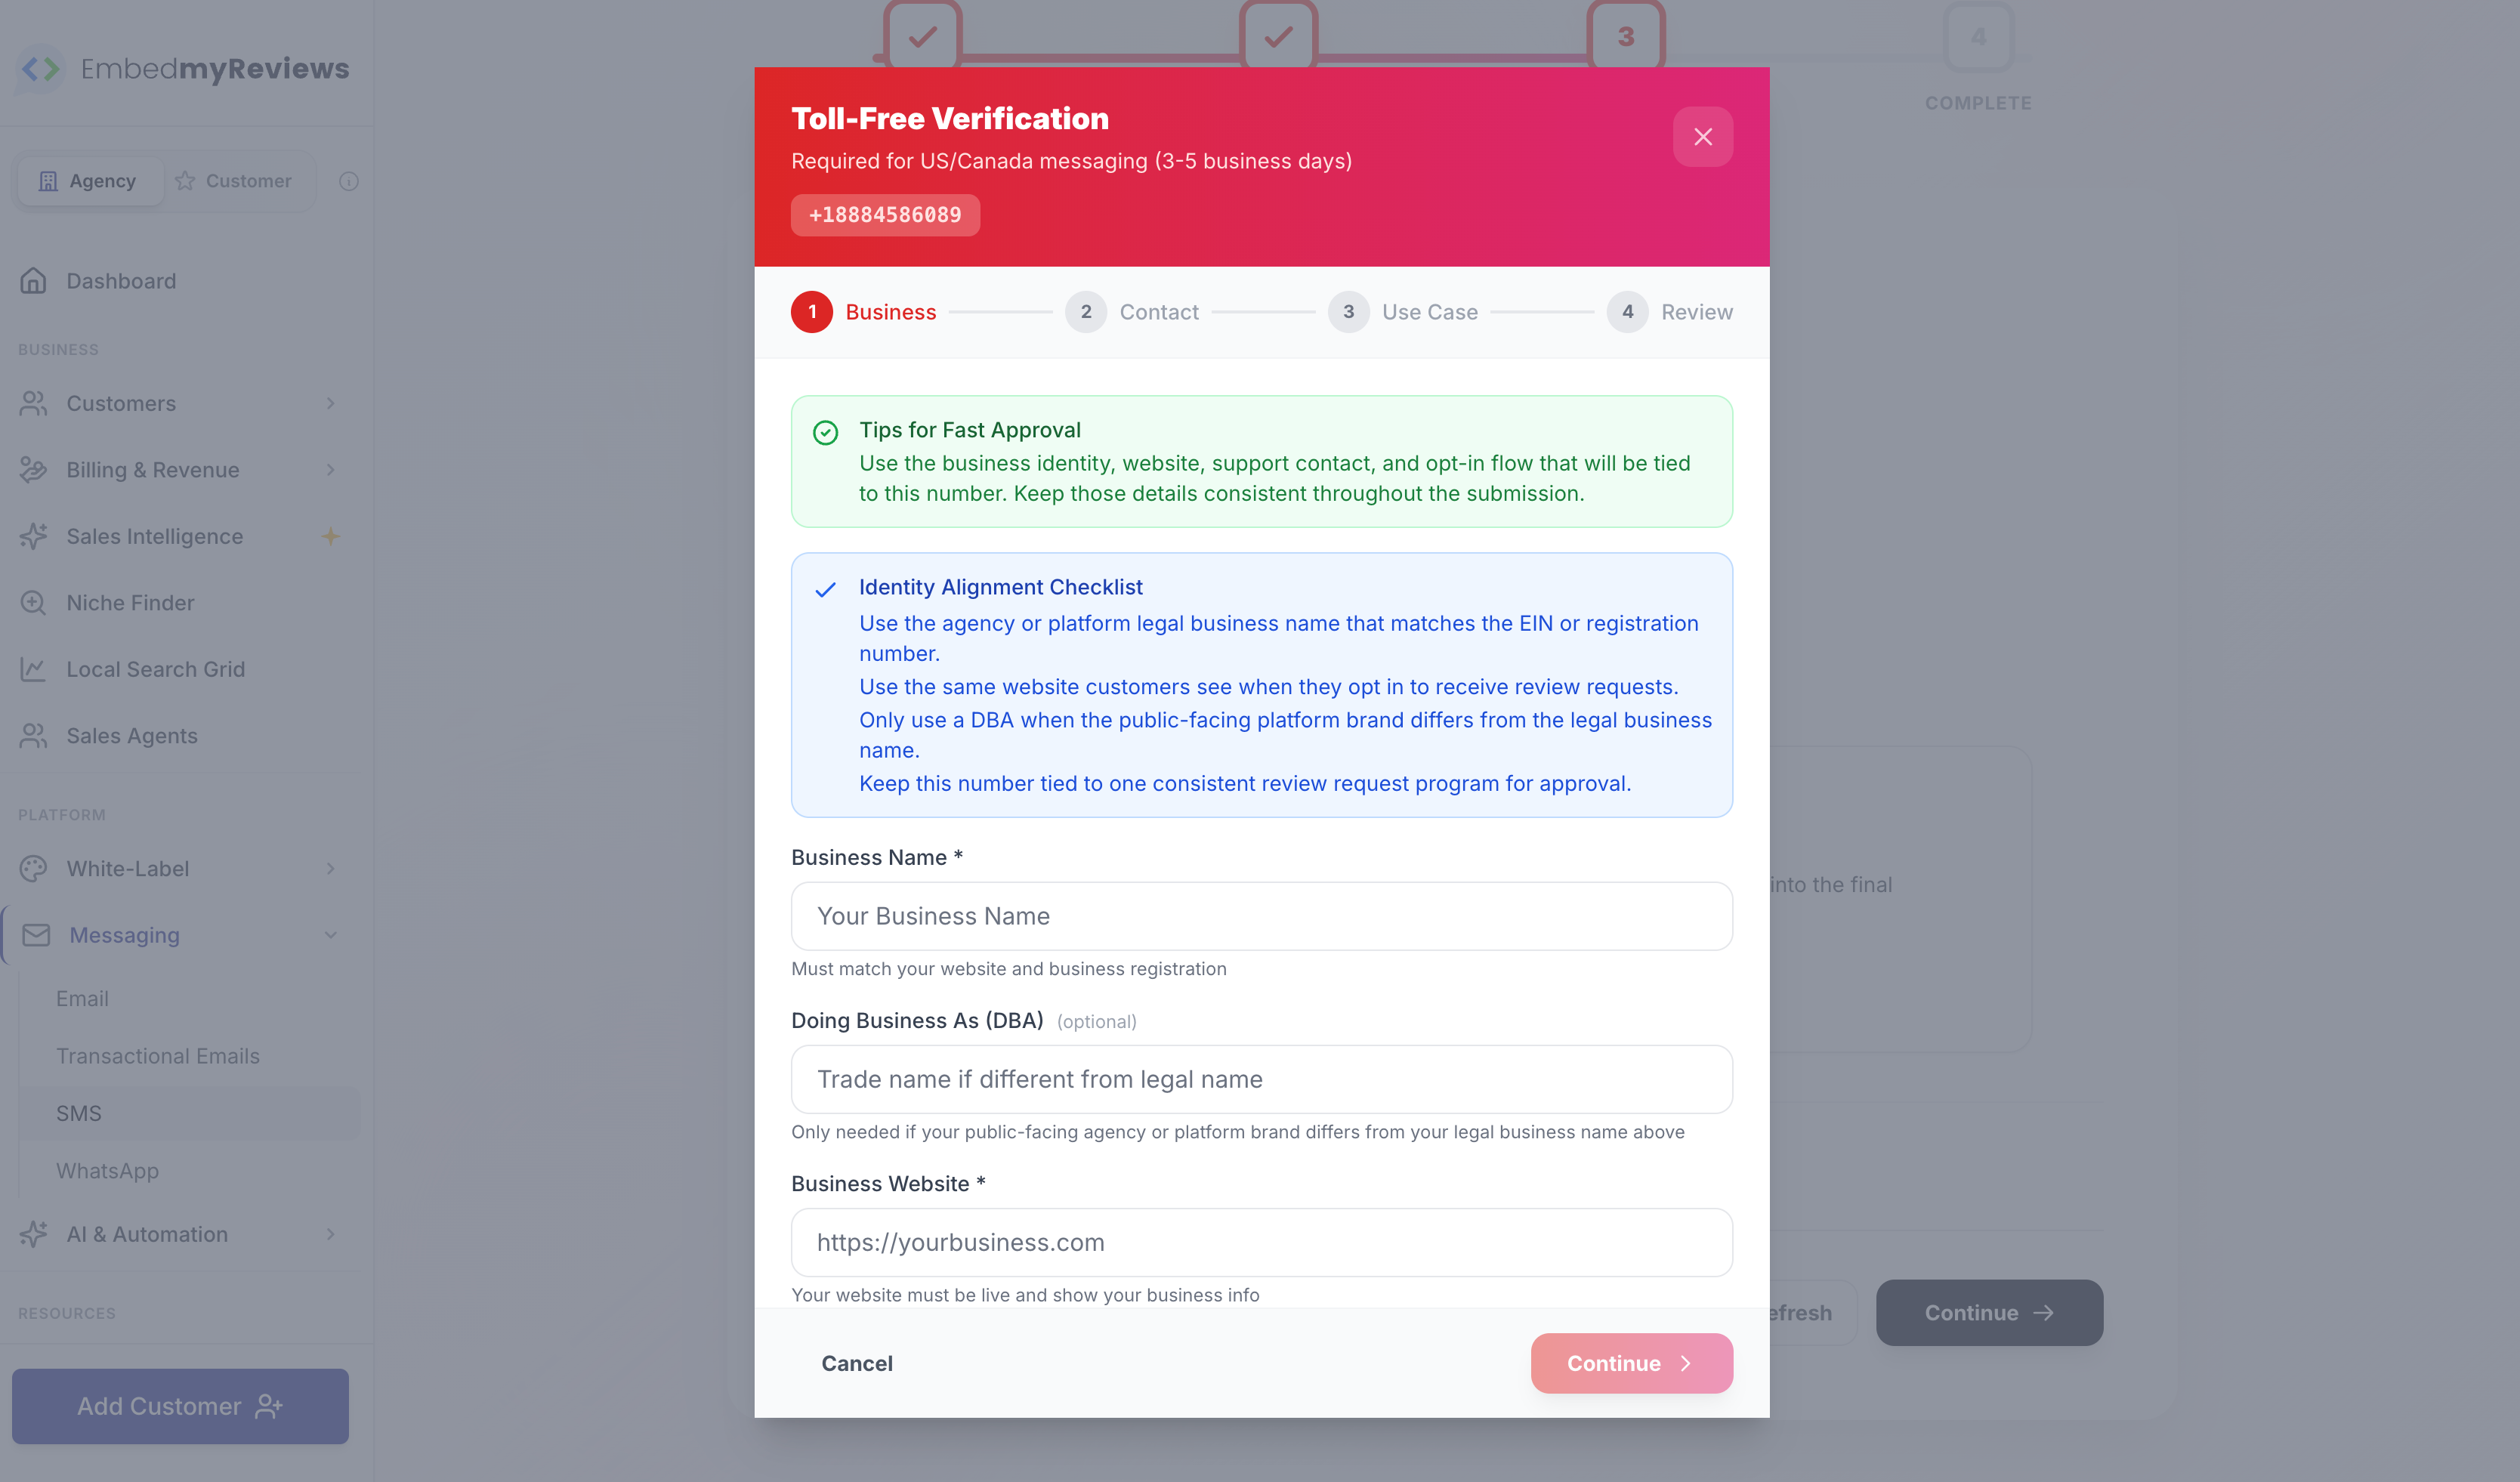
What’s improved A much smoother toll-free setup flow for the US and Canada
We have reworked the Twilio setup experience to better guide you through toll-free verification without drowning you in technical compliance language.
EMR now handles more of the compliance work for you
Instead of leaving you to figure out what to write or how to explain your use case, EMR now prepares much more of the required toll-free verification wording and supporting detail automatically.
Clearer checks before you submit
We have added stronger built-in checks to catch missing information, weak setup points, and mismatched business details before you submit your verification request.
Better consistency across your compliance pages
The information Twilio may review, such as your opt-in page, privacy policy, terms, and SMS examples, is now better aligned so your setup tells one clear and consistent story.
Better readiness checks for your Twilio account
EMR now does a better job checking whether your Twilio account is actually ready for toll-free verification before you start, instead of letting you waste time only to hit avoidable issues later.
Improved tracking after submission
Once your toll-free verification is submitted, EMR now does a better job keeping status updates in sync so you can see where things stand more clearly.
Also included in this release Automatic unsubscribe links for one-way Sender ID messaging
When SMS is sent using a Sender ID instead of a phone number, customers usually cannot reply with STOP.
EMR now handles this more intelligently by replacing the standard STOP footer with a web unsubscribe link where appropriate.
This keeps one-way messaging cleaner, more compliant, and easier to manage without extra manual work on your side.
Supported providers in this update include Twilio, Brevo, and GatewayAPI.
What this means for agencies
You should spend less time trying to understand carrier rules and more time getting SMS live for your clients.
EMR now does more of the heavy lifting behind the scenes, with a more guided and opinionated setup flow that helps reduce avoidable mistakes and improves your chances of toll-free approval.
Important expectations
This update improves your chances of approval, but no platform can honestly guarantee 100% approval every time.
Approval still depends on factors like:
Your real business identity the quality and trustworthiness of your website whether your business details match across your setup how clearly your SMS use case makes sense to Twilio
What EMR can do is make the process far more structured, consistent, and realistic, while helping eliminate the preventable reasons agencies get stuck or rejected.
In simple terms
This release makes Twilio setup easier, reduces toll-free approval friction, and shifts more of the compliance burden onto EMR so your agency can move faster with less confusion.
March 25th, 2026
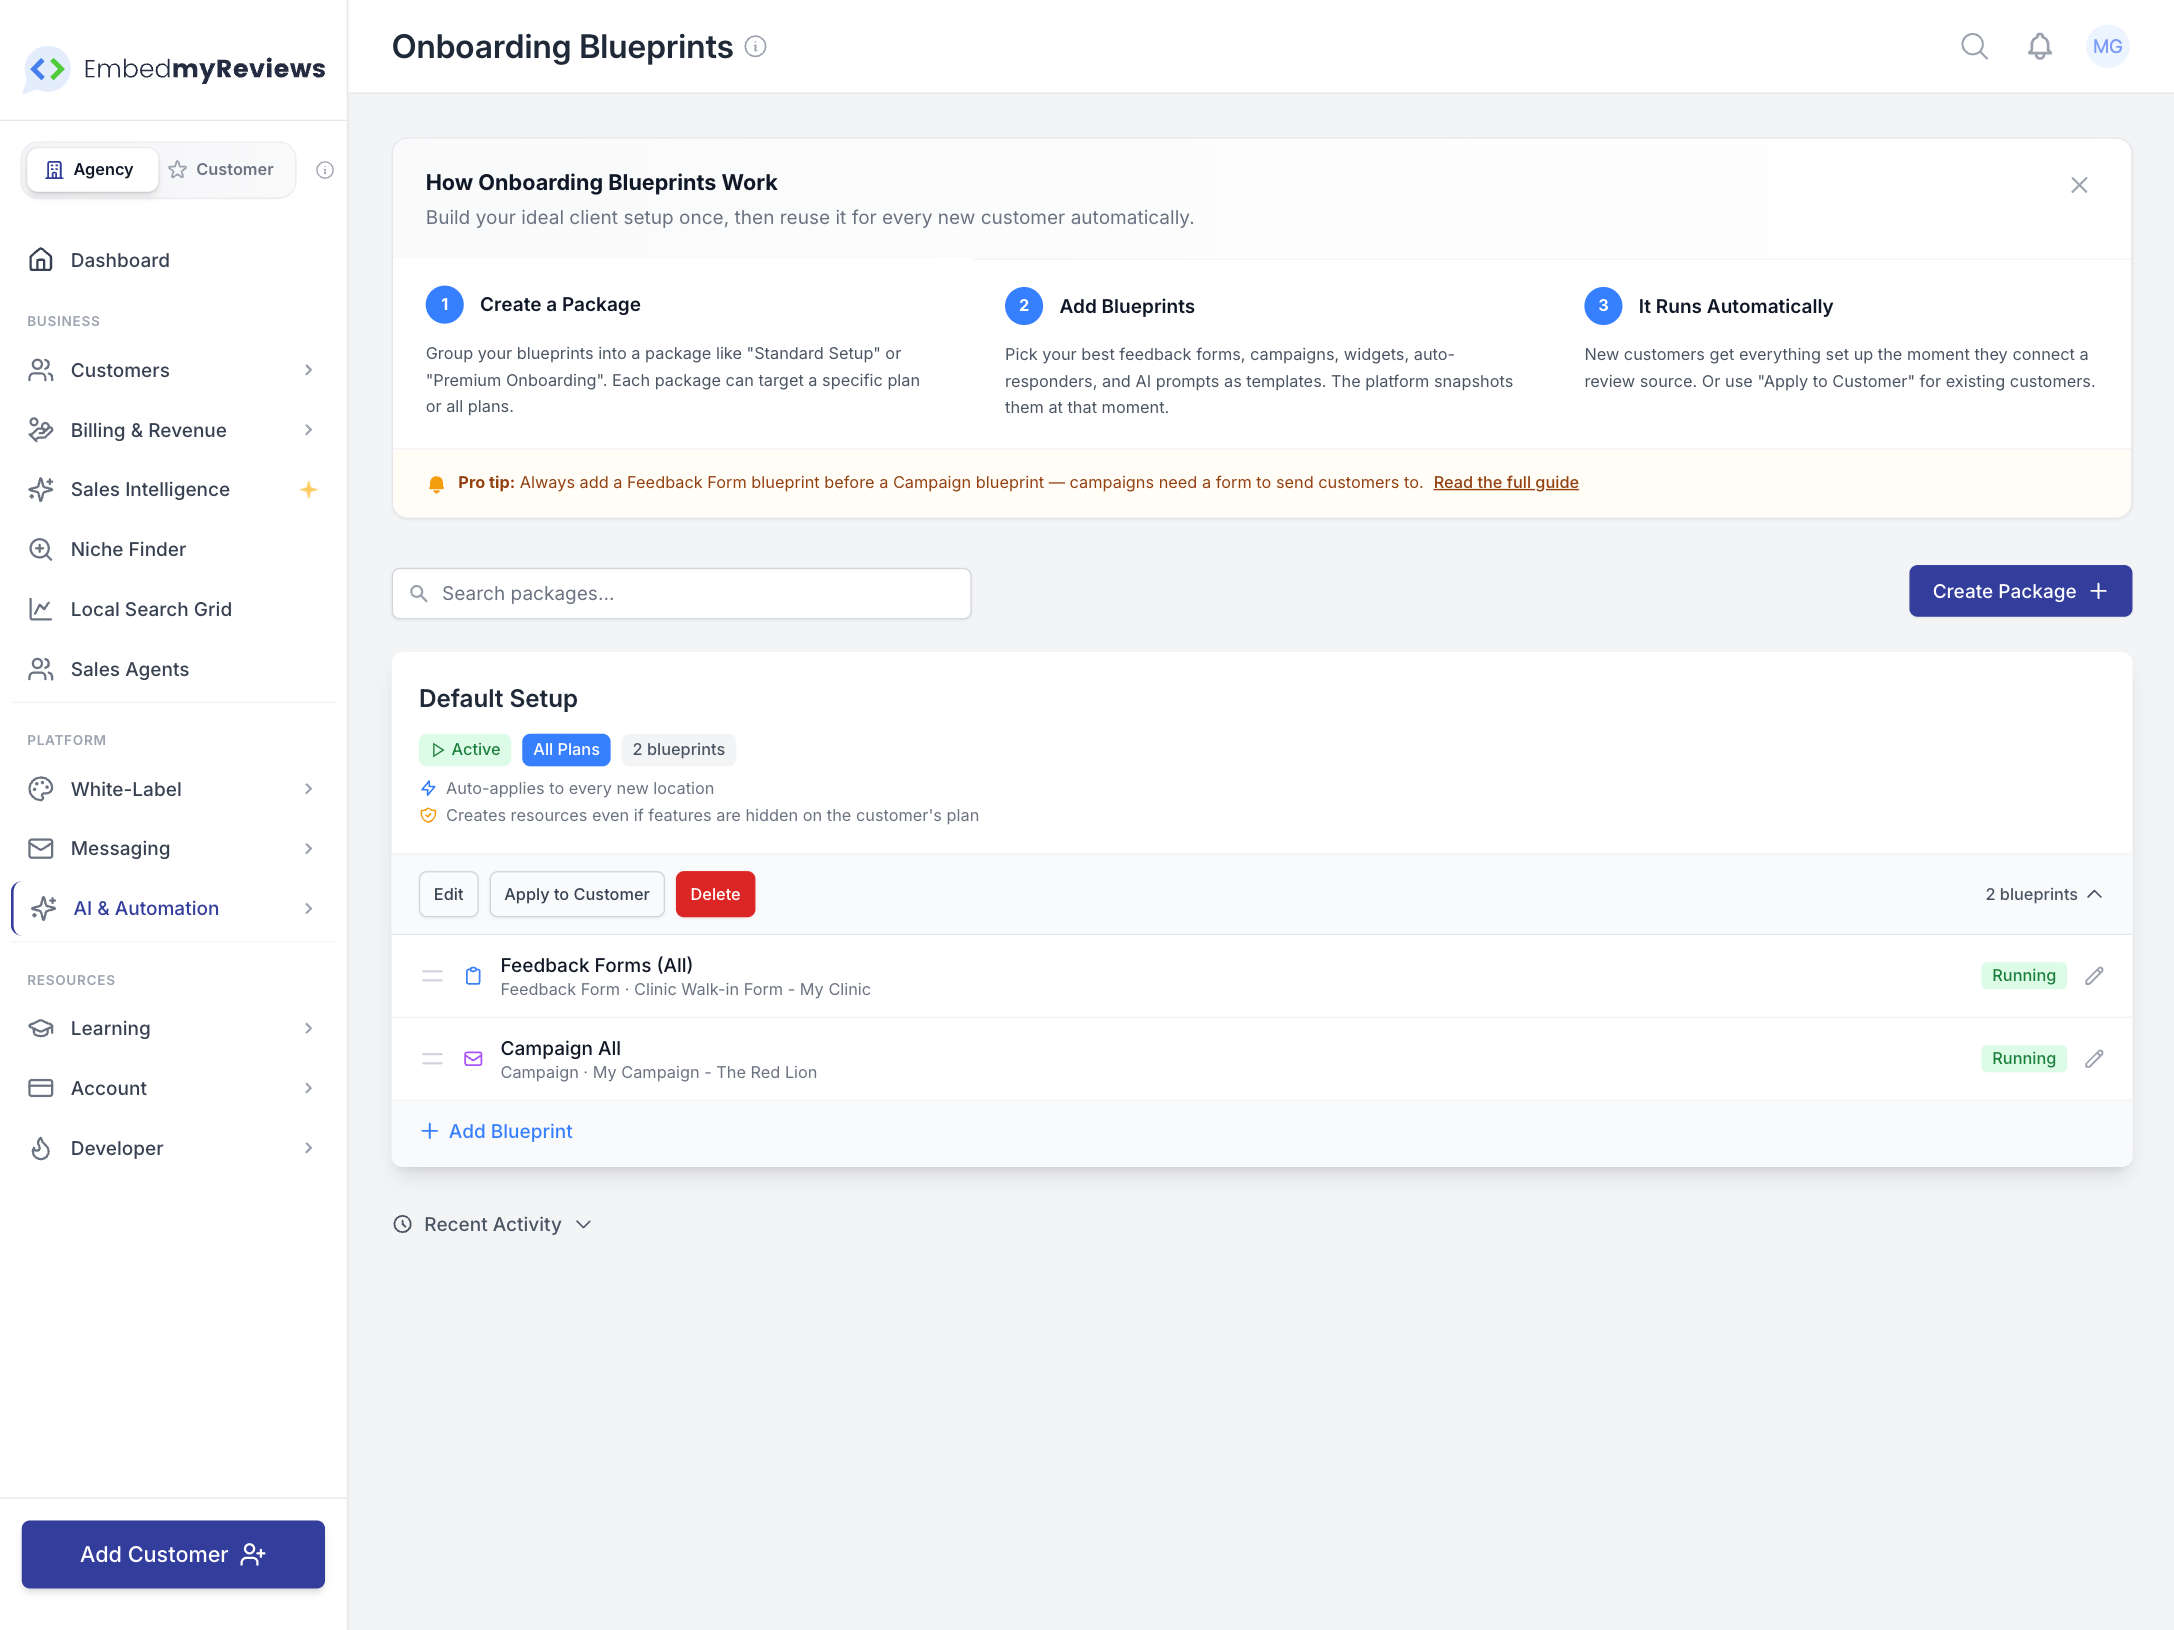
Packages
Blueprints are now organized into packages. Instead of a flat list of individual blueprints, you group them together into named packages like "Standard Setup" or "Premium Onboarding." Everything in a package gets applied together as a set, which makes it much easier to manage what each customer gets.
Each package can be assigned to a specific Custom Plan, so the right setup automatically matches the right customers. Or leave it on "Apply to all plans" if one size fits all.
You can pause a package without deleting it. Paused packages won't run automatically for new customers, but you can still apply them manually whenever you want.
Setup Wizard
Creating a package is now a guided four step process instead of a blank form. The wizard walks you through naming your package, choosing what to include, picking your templates, and reviewing everything before you create it. It takes about a minute to set up a complete onboarding flow.

Two New Blueprint Types
Packages now support Auto Responder and AI Prompt blueprints alongside the existing Feedback Form, Campaign, and Widget types. That means you can now include automatic review reply rules and custom AI response instructions as part of your onboarding setup. New customers get their auto responder and AI prompt created for them automatically, just like forms and campaigns.
Apply to Customer
There's a new Apply to Customer button on every package. This lets you manually apply a package to existing customers who were set up before you created the package, or to customers you want to set up on demand.
You can search for customers by name or email, browse their locations, and select exactly which ones to apply to. You can even queue up multiple customers and locations in one go before hitting Apply.
Locations that are already set up won't get duplicates. The system checks what already exists and skips anything that's already there.
Progress Tracking
When you apply a package, you now get a real time progress view showing each location as it gets processed. You can see the overall progress bar, how many locations succeeded, failed, or were skipped, and drill into individual locations to see exactly which blueprints were created.
If you close the progress window, the work keeps going in the background. An active run banner appears at the top of the Onboarding Blueprints page so you can check back anytime by clicking View Progress.
Location Locking
While a package is being applied, the affected locations are temporarily locked so you can't accidentally apply the same package twice at the same time. Once the run finishes, the locations unlock and you can apply again if needed.
Bypass Plan Restrictions
Packages now have a "Bypass plan restrictions" option. When enabled, the package creates everything even if the customer's plan doesn't normally include certain features. This is useful for VIP clients, trials, or situations where you want to give a customer more than their plan would usually allow.

Dependency Enforcement
The system now understands that Campaigns depend on Feedback Forms. If you try to add a Campaign without a Feedback Form in the same package, you'll get a warning. If you try to remove a Feedback Form while a Campaign still exists, it will be blocked. This prevents broken setups where a campaign has no form to send customers to.
Activity Log
The main page now includes a Recent Activity section at the bottom showing the last 10 blueprint applications. You can see which customer, which location, which blueprint was applied, and whether it succeeded, was skipped, or failed. This gives you a quick audit trail without digging through individual locations.
Improved Source Selection
The dropdown menus for selecting source templates (when picking which form, campaign, or widget to use as a template) now show the organization name alongside the resource name. So instead of just seeing "Standard Form," you'll see "Standard Form - Acme Corp." This makes it much easier to find the right one when you have many resources across different organizations.
Auto Responder and AI Prompt sources now show in the same format, and sources without a valid organization are automatically filtered out to keep the list clean.
Quick Start Guide
The Onboarding Blueprints page now includes a collapsible quick start guide right at the top. It explains the three core concepts (create a package, add blueprints, it runs automatically) and includes a pro tip about the feedback form and campaign dependency. You can hide it once you're familiar with the feature.
Want to understand how and when to use Onboarding Blueprints? Click here
March 12th, 2026
We have just rolled out two major upgrades inside EMR that take white label reputation management to the next level.
Introducing AI Insights and Search AI.
Together they give agencies a much deeper understanding of reputation, customer sentiment, and how visible a business is when people use AI tools to search for services.
This opens the door to a completely new level of reporting, strategy, and client value.
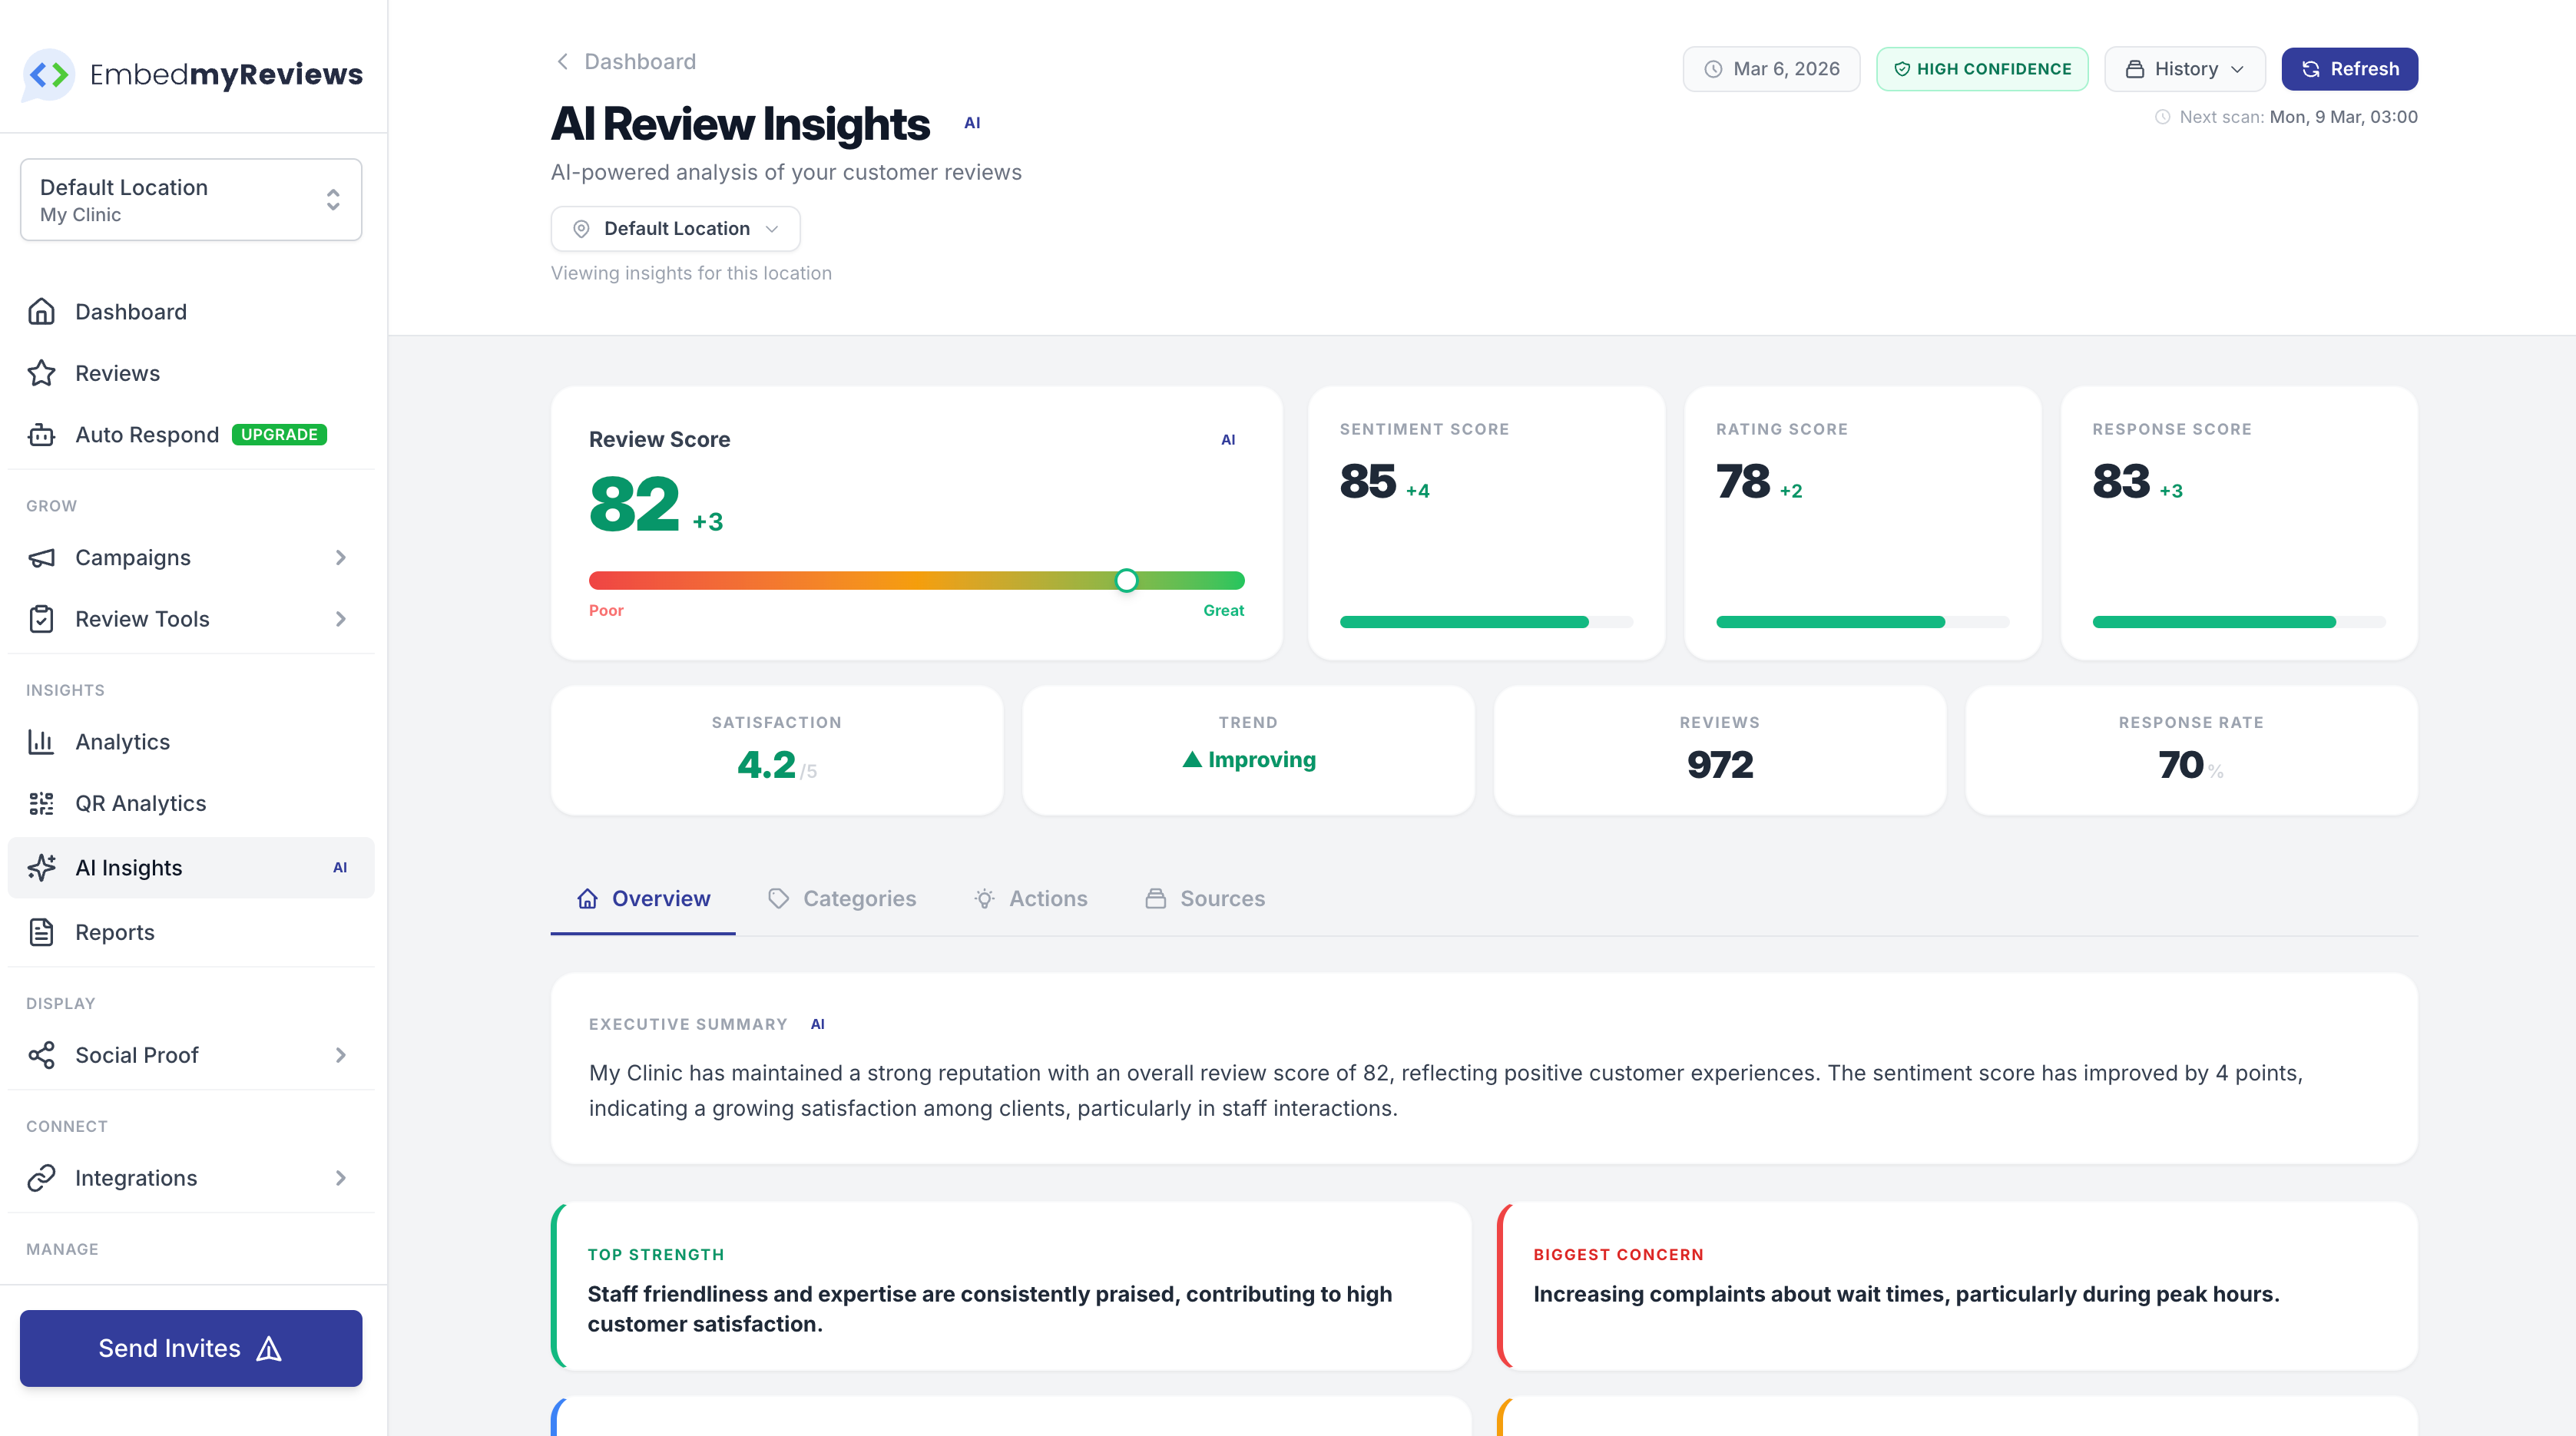
🤖 AI Insights
AI Insights transforms raw reviews into real intelligence.
Instead of manually reading through every review, EMR now analyzes the feedback and highlights the patterns that actually matter.
You can quickly understand
• what customers consistently love
• where complaints are starting to build
• which themes are improving
• which areas are slipping
• what needs attention first
This makes it much easier to prepare better client reports, catch service issues early, and show progress over time.
Agencies can move from simply collecting reviews to actually guiding clients on how to improve their customer experience.

🔎 Search AI
Search behaviour is changing quickly.
More people are now asking AI tools like ChatGPT, Gemini, and Perplexity for recommendations instead of typing traditional searches.
Search AI shows how visible a business is inside these AI platforms when customers ask real questions about local services.
You can now see
• whether the business appears in AI recommendations
• which AI systems mention it most often
• which search questions it performs well in
• where competitors are appearing instead
• whether the brand and website are being recognized
• what practical actions could improve visibility
For agencies this creates a completely new conversation with clients about reputation and discoverability in the AI era.

Like in Sales intelligence we show LLM visibility while prospecting - Search AI is a more powerful, in depth version of this for your paying clients.
💼 Why This Matters for Agencies
Clients care about more than star ratings.
They want to understand
• what customers really think about their business
• where the experience might be slipping
• how their brand is being talked about online
• whether AI systems are starting to recommend them
With AI Insights and Search AI you can now deliver a service that feels modern, strategic, and extremely valuable month after month.
This helps with stronger retention, premium positioning, and much better reporting conversations.
🏷 Built for White Label Reputation Management
Both features are designed specifically for agencies and client facing environments.
They are not flashy AI gimmicks.
They focus on clear insights, practical actions, polished reports, and real recurring value.
🔧 Bring Your Own AI
Like the rest of EMR, everything is BYOK.
You stay in control of your AI provider and usage so your margins stay predictable.
AI Insights supports OpenAI and OpenRouter.
Search AI runs through OpenRouter which makes it easy to work with multiple AI platforms through a single setup.
Most platforms use the same AI providers behind the scenes but resell that usage through credit systems with a markup. With EMR’s BYOK model you connect directly to the AI provider and pay the wholesale cost instead of inflated platform credit pricing.
💰 Extremely Cost Efficient
Despite the power of these features, they remain very cost effective.
In most real world usage
AI Insights typically costs well under a cent per run for a normal account.
Search AI usually costs just a few cents per scan while checking multiple AI platforms.
This means you can deliver premium AI powered reporting without eating into your margins.
🚨 Stay Ahead With Smart Alerts
Both features support proactive alerts so you can stay ahead of changes.
You can be notified when
• review sentiment begins to shift
• customer complaints increase
• reputation trends need attention
• AI visibility drops
• competitors start appearing more often in AI recommendations
This allows agencies to move from reactive support to proactive account management.

📊 Perfect for Monthly Client Reports
These insights also fit perfectly into scheduled PDF reports.
Now your reports can show
• how reputation sentiment is evolving
• what customers are really saying
• recurring service issues
• how AI platforms describe the business
• what actions should be taken next
Reports start to feel less like admin and more like strategy.

Scheduled Reports UI has been refreshed and the PDFs have also been improved with a much better premium look.
⚙️ Flexible for Agency Pricing
Both features work seamlessly with Custom Plans.
Agencies can package them however they want.
For example
Include AI Insights in a premium reputation package
Offer Search AI as a higher tier add on
Bundle both into a fully managed reputation service
This creates clear opportunities for upsells and stronger service tiers.
To enable these features go to custom plans under the reviews look for AI Insights and Search AI both by default are set to upgrade.

🧠 The Simple Way to Explain It to Clients
AI Insights helps you understand what your reviews are really saying.
Search AI shows how often AI systems recommend your business when people search for services like yours.
Together they give businesses a clearer picture of their reputation and visibility in the modern AI driven search world.
February 26th, 2026
This is a powerful addition for agencies and resellers.
You can now show clients exactly how their Google presence is performing directly inside EMR. No extra tools. No manual work. No complicated setup.
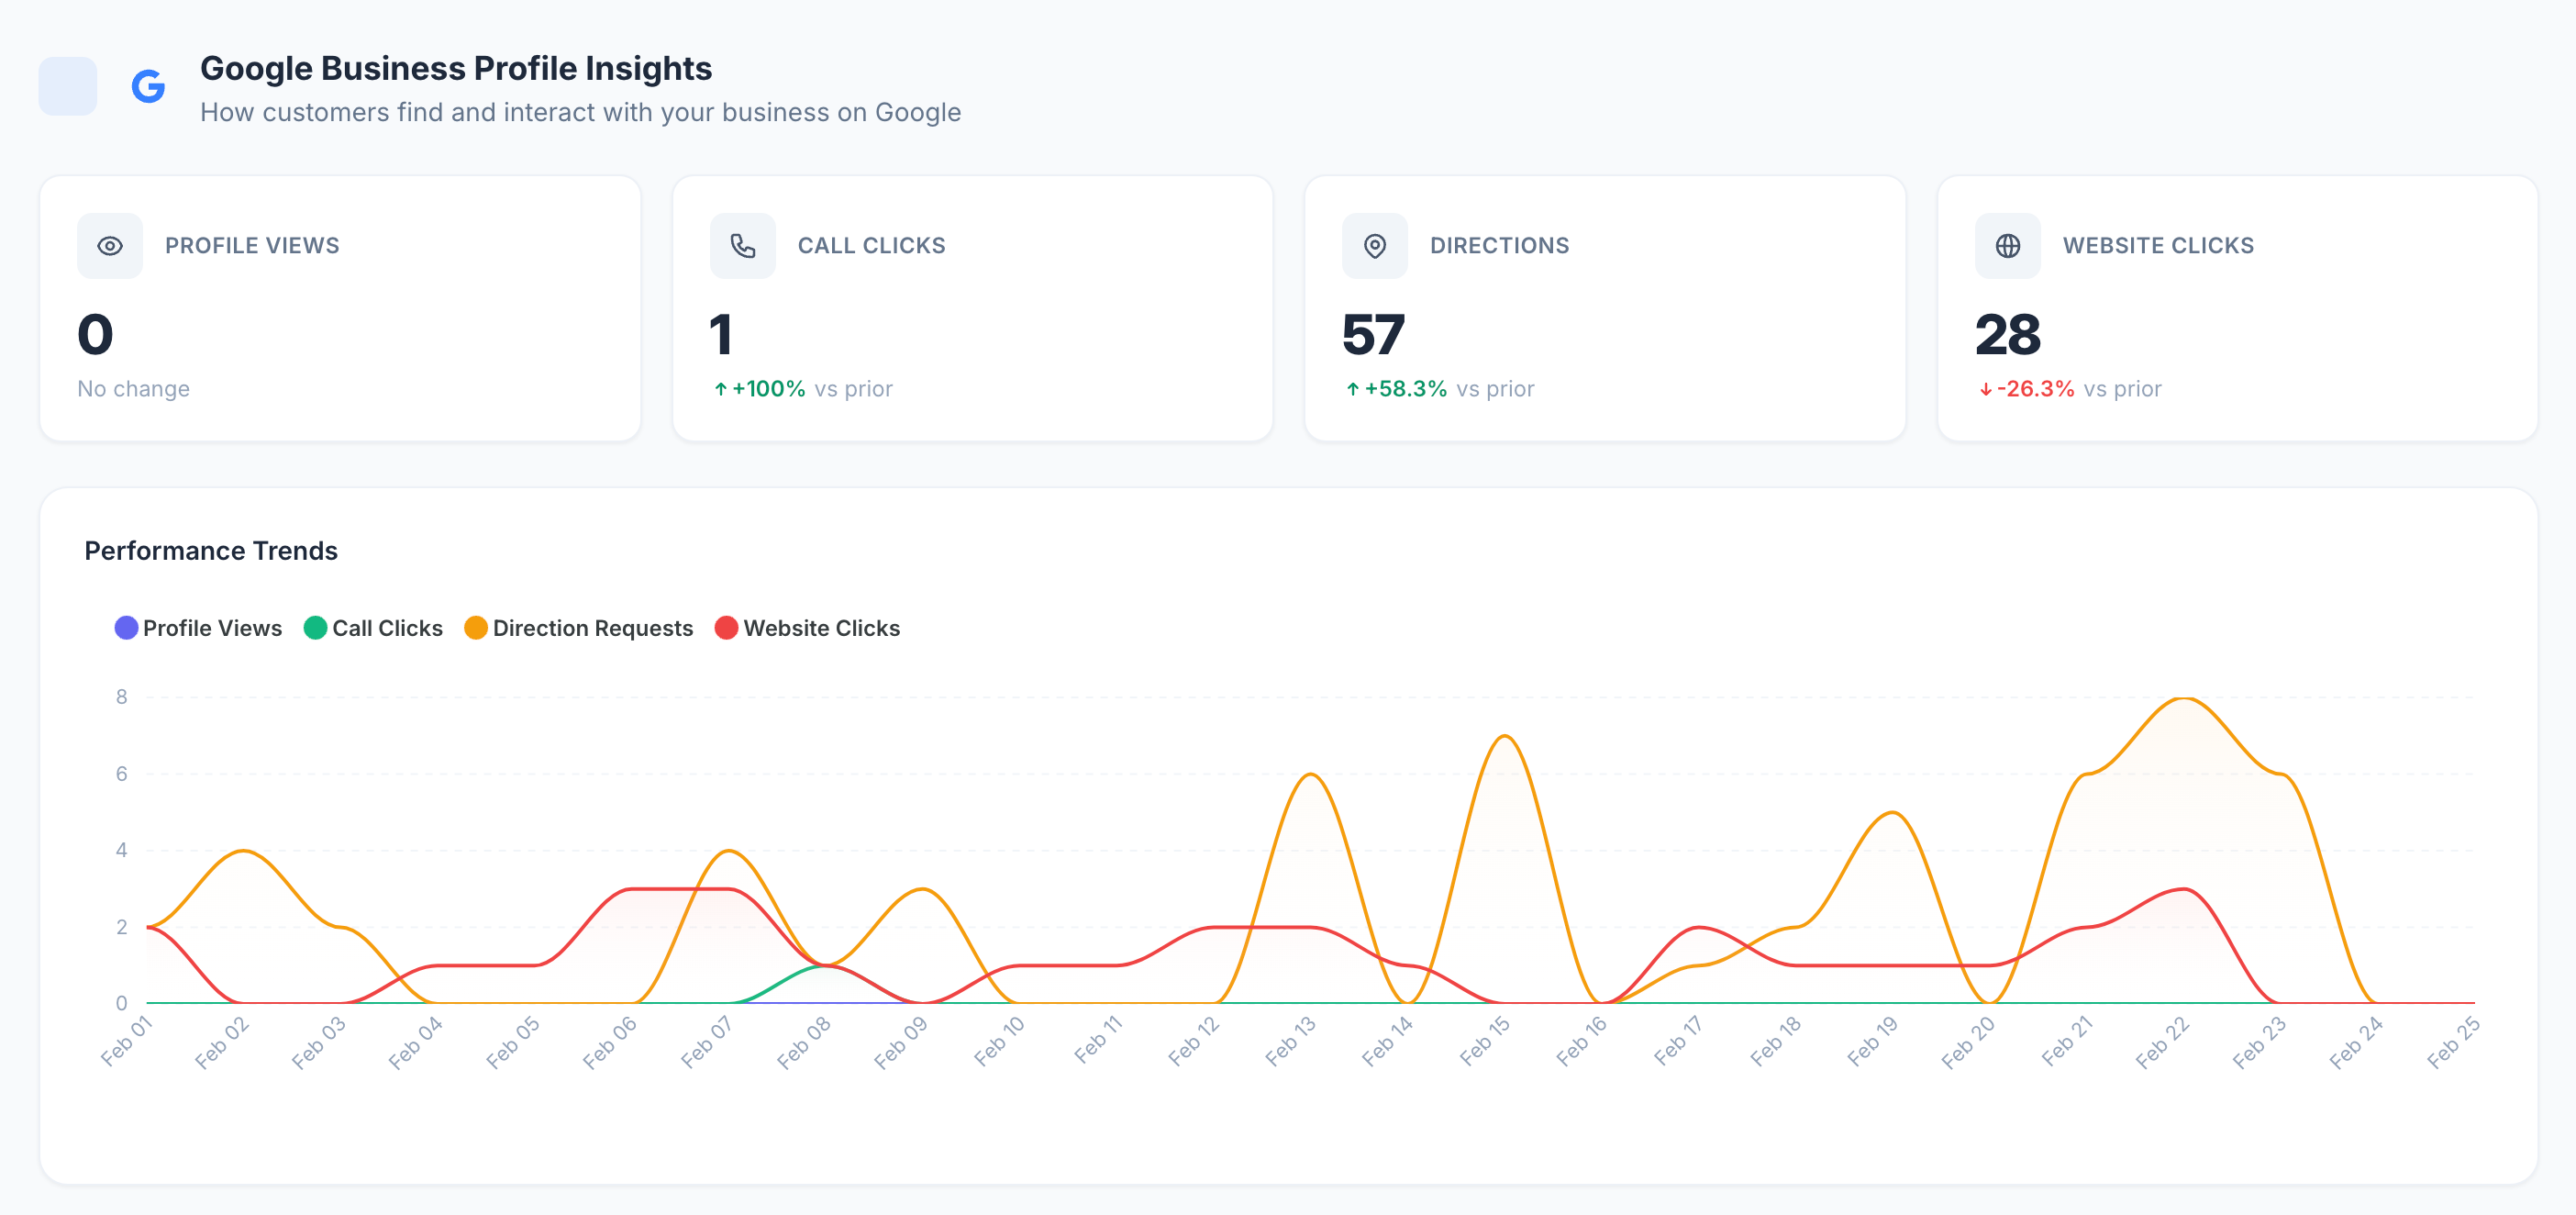
Here is what is included 👇
👀 Profile Views
See how many people are viewing the business on Google Search and Google Maps.
📞 Call Clicks
Track how many customers tapped the call button from the Google listing.
🧭 Direction Requests
Know how often people requested driving directions.
🌐 Website Clicks
Monitor how many visitors clicked through to the business website.
These are real engagement metrics that business owners actually understand and care about.
Where you will find it 👇
🖥 Customer Dashboard
A new Google Business Profile Insights section appears automatically for any location connected to Google.
You get
• Clear stat cards with period comparisons
• Performance trend charts
• Breakdown of how customers found the business such as Search vs Maps
• Device breakdown showing Desktop vs Mobile
🔗 Shareable Dashboard
The same insights are available on the shareable client dashboard.
Your clients can see performance and results without logging in. This makes demonstrating value much easier.
📄 Scheduled PDF Reports
These metrics are now automatically included in your PDF summary reports.
Trend charts are included. No setup required.
How it works 👇
• Data syncs automatically every day
• On first connection we pull up to 18 months of historical data
• Works across all organisations and locations
• Filter by individual location or view combined totals
• Fully responsive and mobile optimised
Important 👇
Stats will begin appearing within 24 hours of connecting Google.
Data is synced every 24 hours at 4am UTC.
EMR manages thousands of connected Google profiles, so during the initial rollout some locations may take a little longer while everything syncs in the background.
Why this matters 👇
You are not just sending review invites.
You are now showing
• Visibility growth
• Customer engagement
• Real business impact
This strengthens retention, supports upsells and helps justify your pricing.
More proof.
More value.
Built directly into EMR.
Let me know your thoughts 👊